Tag Archives: home

My (Very Real) Craft Corner

30 Jan

I’ve been on an organization and cleaning kick for the past couple of months, cleaning out our closet for donations, our shelves for books and movies to sell, our kitchen, because it’s bare and needs some sprucing up, and most recently my little craft corner.

I tend to do my work on the couch where it’s comfy, but sometimes I need table space, and don’t want to clear off our dining table. So, I brought in a little folding table we had (and rarely used) in the laundry room downstairs, and put it by my sewing table. I removed the wire shelving I had behind our couch, where I stored all of my craft supplies, and moved the supplies into our corner cabinet, and made a curtain to hide them. Now, I have a nice little nook where I can work and take pictures for the Etsy shops.

It's no Martha Stewart Living feature, but it's practical!

It’s no Martha Stewart Living feature, but it’s practical!

Everything tucks (sort of) neatly behind the couch.

Everything tucks (sort of) neatly behind the couch.

That corner cabinet is packed with labeled plastic shoe boxes and bead organizers. I had to do some serious downsizing to make sure everything would fit, and it came out just right! Now I just can’t buy any supplies for a while …

All of my frequently used supplies are at hand in a few cute containers on the table. The cute crocheted own (made by my talented mother in law!) is filled with embroidery thread, the blue container holds current projects and items that need to be photographed, and the green container holds scissors, drawing and writing supplies, and other small items like a tape measure and pins.

In case you’re wondering, all those containers that look like they’re going to topple over underneath the table are filled with sewing supplies: fabric on bottom, patterns in the middle, and thread and other supplies on top. Next to the stack are embroidery supplies.

I even made a dust cover for my machine from a couple of dollar store place mats and some ribbon. Here’s a similar tutorial using a tea towel. The rolling drawers are filled with supplies we use when we do arts and crafts shows: packaging on top, business cards, labels and tags in the middle, and general supplies on bottom. My sketch and note books, and my inspiration binder are all on top, waiting to be grabbed.

That pretty, funky lamp above the sewing machine is a Loomi Light. It’s made from cardstock pieces that you can alter and assemble yourself; I painted mine with watercolors. You can find the kit here.

So, that’s it! It’s not particularly pretty, but it’s a colorful, functional, organized space with a ton of natural light that inspires me to work. That’s really all I need.

Gentle hugs,

Chels

A Holiday Home Tour – Winter is Here!

3 Dec

I’ve finished putting up our indoor decorations here at the casa, and the place is looking rather festive, if I do say so myself!

Of course, it’s taken me weeks to finish. This year, I used lots of jewel tones. I like to use them in our decor, anyway, so it kept costs down, and made the theme simple to create. We don’t have a mantel or bar to hang the stockings from, so I hung them from our corner book shelf with care. I found several new things from thrift shops in our area, like a package of metallic jewel toned snowflake ornaments, and a small tree that I decorated with a strand of gold sequins. I made quite a few of our ornaments this year, too! I painted wooden owls in purple and green with glitter, created iridescent white tassels from embroidery thread, and strung colorful pom poms on a strand of metallic gold thread as a garland.

The fake mistletoe is hung, so now it’s time to finish the outdoor decorations!

Gentle hugs,

Chels


Our bohemian fall.

15 Nov

The fall/Thanksgiving decorations are up! After stopping by Michaels and noticing these cute packages of little felt shapes meant as table scatter, I decided to make some garland, and put out some fall decorations. The weather is getting cool here in Texas – we had our first freezing temperatures overnight last night – and I can’t wait to make some new dishes for Thanksgiving this year.

032

You can see the garland, strung together with dark purple embroidery thread, on the mirror. I found the tablecloth when going through my dad’s cedar chest, and mixed some leaf shaped votive holders with ones I already had, along with some dollar store glitter pumpkins, and small white (real) pumpkins.

020

I use jewel tones year round, but especially around the holidays!

048


Our corner cabinet is filled with handmade fabric pumpkins, festive leaves, knicknacks, and, yep, more garland.

057


I strung a few strands of fairy lights along the back of our bookshelves, added more fabric pumpkins, and books in coordinating colors.

If I’m being honest, I also put up our new table top Christmas tree. I just couldn’t wait! It’s the only winter decoration I have up, and I’ll be decorating it up to Christmas, I’m sure. Here’s a sneak peek:

063

Wishing you all wellness in the cooler weather, and happiness this holiday season!

Gentle hugs,

Chels

Outdoor Halloween decorating and apartment living

30 Oct

Needless to say, it’s a bummer when you’re browsing the aisles of all the cool outdoor holiday decorations, and you’re currently living in a small apartment. Those inflatable lawn decorations – out. Giant tombstones – where would those go? Lights – no roof to hang them. So, what’s an apartment dweller supposed to do?

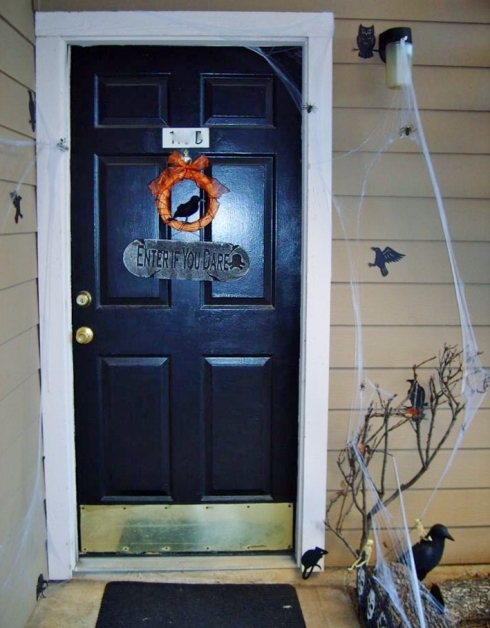
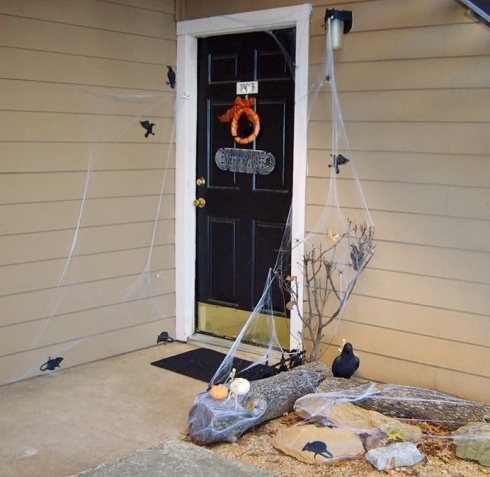
A few days ago, my mom mentioned that she wanted to decorate her apartment for Halloween, but didn’t have any outdoor decorations. She asked if I could bring some with me that day, so I decided to just surprise her and decorate her front door for her. I’m here to tell you – it can be done! Here’s proof:

MomsDoor2013 - Copy

The wreath. I used is simply a small, plain wreath wrapped with orange and black organza ribbon, featuring a feathered crow, and a styrofoam sign. You probably don’t even need a wreath hanger to display a wreath on your front door – just tie a ribbon to the wreath, and through a door knocker if you have one. Most people don’t use them, anyway! (Just be safe and don’t block the peep hole.)

HuntingtonMeadows Use what’s around your apartment. Bushes and plants can be covered in lights, cobwebs, and spiders. You can sprinkle fallen leaves in the cobwebs for a less scary look. Luckily, there are some logs and large rocks already outside her door that made for great props, along with a fallen branch that still had some autumn leaves hanging on. I stood up the branch to create a “tree,” and started spreading the cobwebs! Spider webs can make a big impact, especially when paired with a black light.

Buy and make decorations that are reusable, and small and/or flat, so that they’re easy to store. It doesn’t take bins full of decorations to make your home festive! I added bird and mice silhouettes, a large plastic crow, some plastic “wrought iron” skull fencing, and a few strategically placed mini skeletons. Silhouettes are simple and effective. They take up no space, and you can decorate all the doors and windows in your apartment without breaking the bank. Add spooky colored lights around the inside of the window frames for extra ambiance. Try using lights all in one color for a cohesive look.

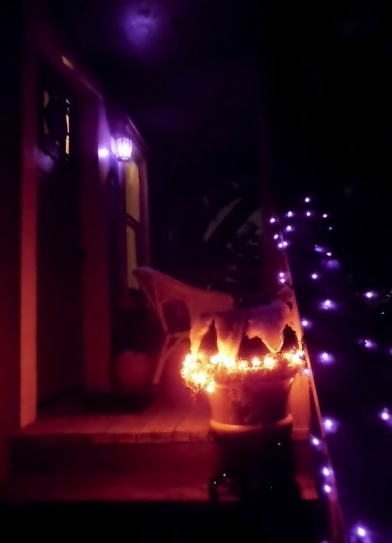
The staircase. At our place, we live on the second floor, so I took advantage of it:

005I added purple lights to our banister, and placed a cauldron on an urn with orange lights wrapped around the base, which I filled with moss, to look like fire. I added a broken limb to stir the brew with, and a sparkling black cat to reflect the lights at night. Then I switched the bulb in our porch light – a quick and inexpensive mood changer.

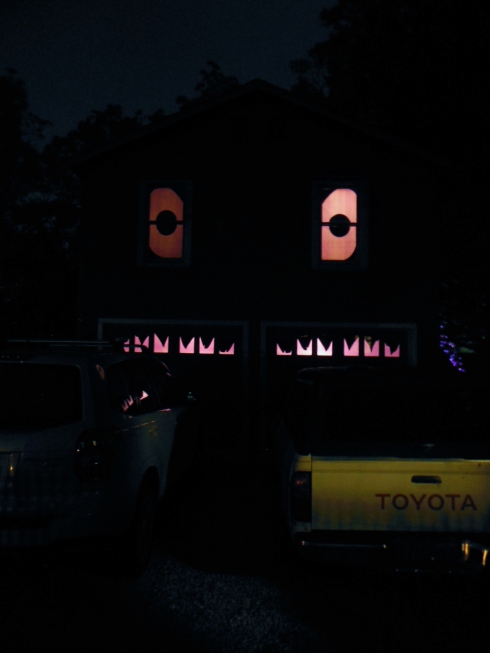
The house (may have) eyes. I also took advantage of our above garage apartment! From the driveway, the windows create the illusion of a face, so I ran with it and created a purple monster to match the purple lighting. I used black poster board to cut out eye and teeth silhouettes, which I taped to the window, then covered in purple plastic tablecloth.

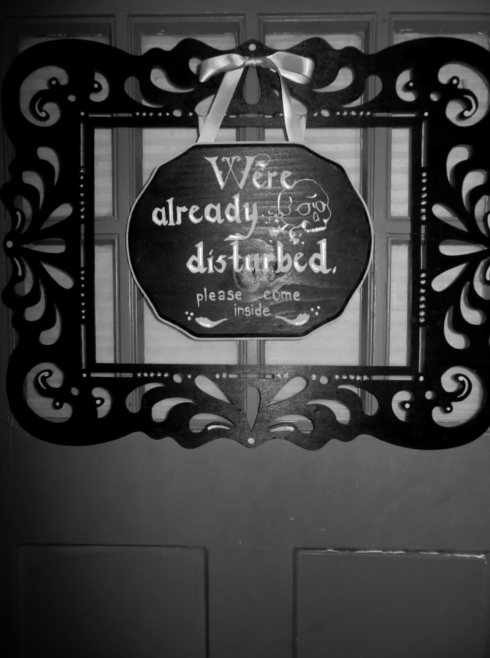
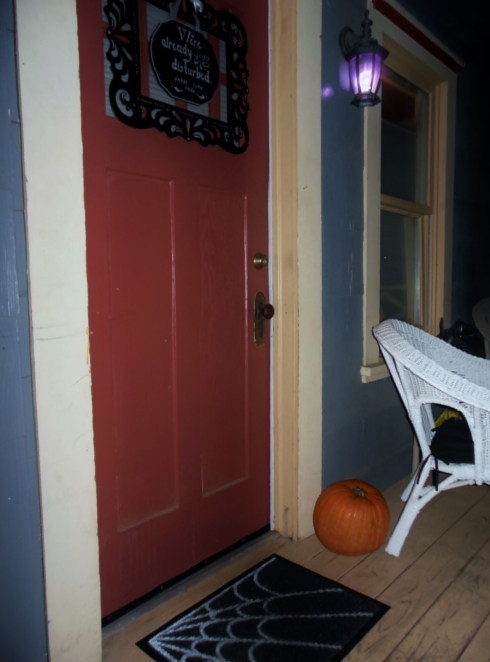
012 Get a little unconventional. Instead of a traditional wreath like my mom’s, I was inspired by the shape of the small window on our front door and used a wooden frame I found at Michaels. I painted it to match a plaque I’d already begun painting; the plaque was the perfect size to fit inside the frame and hang from an existing nail in the door. Now, I realize that not everyone has a wooden door, or a window on their door, but the frame idea still works well on more standard apartment doors. It’s pretty cute to frame your door number.

001Last but not least, switch out your door mat! I bought a cheap black utility mat and painted a simple spiderweb pattern on it with white acrylic paint. It cost me about $4 to make, but you can also find inexpensive themed mats at dollar stores and hobby stores. If your front door is located in a windy corridor, though, it’s worth investing a few more bucks on a heavier mat that won’t blow away.

022

Happy apartment Halloween decorating!

Gentle hugs,

Chelsea

My home: A Halloween Tour! + Cheap and Easy Decorating

27 Oct

I had planned on having a Halloween party this year at our new place, but because of recent events, I’ve decided to wait until next year. Instead, we’ll be handing out candy to the little ones with our new neighbors. I love the holiday so much, though, that I wanted to continue decorating, anyway! So, here’s a peek at our spook-i-fied place. Be sure to read the captions for inexpensive and easy last-minute ideas on decorating your home for Halloween!


Gentle hugs,

Chels

How to move like a boss (with chronic illness.)

15 May

The apartment is a little crazy right now, with some things in boxes, and some things being sorted out for donations. While I’m in moving mode, I thought I’d share some tips to make moving cheaper and easier for you, especially if you have chronic health issues.

Start packing in advance. Rather than waiting until the day of, or even a couple of days before, your move, start packing things as far in advance as possible. Pack a little bit at a time, beginning with decorative things, or things you rarely use. Pack up your kitchen with the exception of a couple of plates, cups, and necessary utensils, that you can use for the next few weeks. (You may even realize that you don’t need all of those plates and cups, anyway.) Starting several weeks before you move means that there will be nothing to do but move boxes on the big day, and it means that if you have a flare or an especially bad pain day close to the move, you won’t have the stress of trying to get everything done while you feel awful.

Donate, donate, donate. You will find, as you start packing early, that there are some things you forgot you even had. As you pack, designate a few trash bags or boxes for donations to your local Goodwill, church, or mission. This year, our donations are going to a friend who’s organizing a yard sale fundraiser for her friend’s son who was recently diagnosed with leukemia. If you’re unable to take your donations to the charity of your choice, see if they’ll pick them up at your home, or if a friend or family member can take them for you. By donating, you’ll save yourself time and energy moving things you no longer need or want.

Our donations (so far!) Notice I only used a couple of boxes; the rest is in trash bags.

Our donations (so far!) Notice I only used a couple of boxes; the rest is in trash bags.

Sell, sell, sell. Moving can be expensive, even if you’re frugal. There are application fees, deposits, possible repair costs, and you may have to pay to set up internet or utilities. So, if you have some “big ticket” items you’ve decided you no longer need, sell them! Furniture, new clothing and shoes, electronics, and gently used tools are good examples of items that are sale-worthy. All it takes is a couple of good photos, a price, and Facebook or Craigslist. (Be sure to let people know if they’ll need to pick up whatever it is you’re selling.) I posted pictures and information about our chest of drawers on Facebook, and within an hour, it was sold! If you aren’t sure what to price something, take a look on Craigslist or Ebay for similar items. Put that money aside to be used specifically for moving expenses, and your wallet won’t suffer.

Organize as you go.  This is a life saver. While you’re sorting out your donation and sale items, you may as well organizing what you’re keeping, right? Making sure like items are together, putting them in organizational containers, and labeling them as you pack will save you a ton of time and frustration.

*If you find an item in your bedroom that should go with your bath items, resist the urge to go ahead and throw it in with your bedroom things! Make a pile to the side of items that don’t belong, and when you’re done in one room, take them with you to their rightful place. It may seem like you’re saving time by just tossing unlike items in the same box or bag, but you’ll be so glad that you didn’t when it comes time to unpack.

*Utilize space-saving containers, like plastic bins that can be slid under the bed, or rolling plastic drawers that can be easily moved, as you pack. It’s wonderful when your office, bath, kitchen, and/or garage items are already packed in their respective clear or color-coded storage containers. You can also use vacuum seal bags or Ziploc bags in various sizes to store out of season clothing, or small craft supplies to save room. The money you may spend on new, more durable storage containers will be offset by the money you won’t have to spend when you move again, or when you decide your space needs to be more organized. There’s less to pack and unpack, the containers are easy to identify, and quick to store. Hint: Dollar General, Dollar Tree, and Family Dollar are gold mines when it comes to small and large storage containers. Think outside the box for small containers, too, like ones for organizing drawers, and check out the kitchen area, where plastic trays, bowls, and cups are just waiting to be used.

More Dollar Tree containers hold all of my craft supplies on wire shelving. Labeled, of course!

More Dollar Tree containers hold all of my craft supplies on wire shelving. Labeled, of course!

009

These are my embroidery supplies, in a container from Dollar Tree, and the floss is separated by color in Ziploc bags.

*Label everything. If it’s going in a box or bag, label with box with what’s inside, and which room it belongs to with a Sharpie. If you’ve organized your belongings in the aforementioned awesome storage containers, invest in a label maker to identify what’s inside. Use sticky notes or plain old paper and tape to mark to which rooms the containers go, and you can remove them easily as you go.

008


My handy label maker put to good use!

My handy label maker put to good use!

FREE is good. Use what you have. After you begin organizing your things in plastic containers and drawers, you may find that there’s not a whole lot left that needs to be packed in boxes. To avoid making an extra trip and spending more money, use things you have around your home to pack the rest. Use trash bags, plastic and reusable shopping bags to contain pillows and bedding. Use spare, clean blankets and towels to protect fragile items, like collectibles, plates and glasses, or even furniture. (You can also put an old blanket under a piece of furniture to easily slide it across the floor when moving.) If you need boxes, check Craigslist.com’s “free” section, or utilize your Facebook page to see if anyone has spare boxes you can use. While you’re at the grocery store or dollar store, check to see if they have any boxes they’re throwing away. They’re usually more than happy to let you have them.

Plastic and reusable shopping bags to pack up the craft room, and an old bedding package to hold all of my fabric scraps in one place.

Plastic and reusable shopping bags to pack up the craft room, and an old bedding package to hold all of my fabric scraps in one place.

Make a list. If you easily get distracted or forget things, like I do, create a list. Need to turn in keys? Need to have the old place cleaned by a certain time? List things in order of importance, and you’ll be less likely to get stuck scrubbing the bathroom by yourself at 11:45 p.m.

Ask for help! Now is the time to decide if you want to hire movers, or enlist your family and friends. Sometimes it’s more than worth it to hire movers; look for a company that only charges you to move, so that you can do the packing yourself. That way, you don’t have to do any heavy lifting, but you’ll know where all of your things are once you’re settled into your new place. If your friends are helping, see if you can incorporate a truck or two in the mix. Larger vehicles = fewer trips, and that makes everyone happy. If no one you know drives a large vehicle, rental trucks are available through moving companies, but sometimes you’ll find a better deal at a hardware store, so don’t forget to check yours. Remember that more volunteers to move your stuff isn’t always better. Depending on the amount you’re moving, 4-6 people will make the time fly by, and there’ll be less confusion about where your furniture and boxes should go.

I know some of this may seem like common sense, or maybe even a little anal retentive, but it’s all helped us keep our sanity in the past, so I hope these tips help ease the pain of your next move!

Gentle hugs,

Chels

Celebrating ends and new beginnings.

5 May

These past several weeks have been an absolute blur!

I successfully planned and helped host our yearly spring banquet here at the center, all while Tom and I were searching for our new home, and helped decorate for our end-of-semester barbecue and karaoke party, while I wasn’t packing to move into our new apartment.

Here are some fun photos of the banquet, a few taken by me, the others taken by our pro photographer friend (and karaoke expert,) Caven Marsh. I had so much fun handing out our paper plate awards again this year, and taking goofy pictures with some of the dear friends we’ve made. We were also blessed with a parting gift from the board of directors, including a beautiful, eco-friendly bamboo plaque.

So, we did it. We found our new home, and it couldn’t be any cooler. While it’s bittersweet moving out of the Tri C, I’m happy for this next chapter of our lives. My mom is also in the process of finding a house, so it’s a really exciting time for all of us! Friends of ours from church referred us to the landlady who lives a street over from them in the historic area of downtown Arlington. They told us that she was going to be listing a duplex and an above-garage apartment soon, and that we should call her a.s.a.p. to view them. To be honest, I wasn’t sure how I felt about an above-garage space. I’ve never been in one, and I’ve never known anyone, that I know of, who has lived in one. I knew that it was small, and that it was behind a beautiful turn of the century house, so it was worth looking into. I was leaning toward the duplex, but when we met with the landlady, she told us that it had already been rented.

So, we made our way up to the little apartment, and we fell in love. It’s like a tree house! The garage below used to be a barber shop, and the original sink and mirrors still remain. The kooky contractor who helped renovate the house found a – no kidding – mummified rat in the walls that was so well preserved, they decided to create a memorial to him and name him Dougie. He now rests in a plexiglass window/shadow box in the wall between the garage and laundry room. Weird, I know, but when we began talking about pets, and mentioned we’d had rats before, she was so excited to show us the little guy! Wood floors, an archway, a claw foot tub, and lots of natural light later, we decided to apply. Granted, it’s not exactly what we had in mind; we still won’t have a dishwasher, but we’ve made it the past few years without one already. The bedroom is significantly smaller than the one we have now, but we were told our queen size bed would still fit (just not much else.) Fortunately, though, we can sell our chest of drawers and get creative with our limited storage space. It’s kind of nice to downsize a bit, anyway. Less to dust.

Soon I’ll be taking pictures and measurements to see what other furniture we can keep, and what needs to go. I’ll be weeding through our other things to see what needs to be donated, stored in the garage, or displayed in the apartment. I’m currently drowning in Pinterest boards about organization, small living spaces, and DIY bohemian-style projects, seeing as that’s the direction I’ve been going with our decor for a while now. Why not give in and make things gypsy-caravan-and-vintage fabulous?

You can take a gander at the rest of my “New Apartment” board here. There’s more boho inspiration and genius decorating and organizing advice.

Gentle hugs,

Chels

Traveling through the fog – maintaining order through illness

11 Apr

I’m not necessarily a neat freak, but I do like order. I’m a planner, a note taker, and … a forgetter.

Folks, sometimes the brain fog gets so bad that I just have to laugh. Sometimes I have to cry, too, because it can be so frustrating. There are days when I just don’t know if I have the energy to make one more trip to the other end of the apartment because I forgot one more thing. So, to make it a little easier on myself, I try to maintain some order to my routine, and to our living space.

FlyLady.net is a great resource for developing and maintaining a cleaning schedule, as well as maintaining order in other areas of your life. I have to confess that I’m not able to keep a very regular cleaning schedule with our unpredictable schedule here at the student center, but splitting up chores on different days helps me not wear myself out and end up in extra pain. We are notorious for letting the dishes pile up in the sink since we moved into the center’s intern apartment, which doesn’t have a dishwasher, but every time the dishes DO get done, I think of Fly Lady’s tip to give the sink a clean while I’m at it. It really does make a difference. The sink is already wet, and I already have the scrubber in hand.

FlyLady cartoon

I came across this next link on Pinterest this evening, and I think I’ll give it a try. There are tons of printables to use, from meal planning to important contact info, and you can pick and choose which ones you want to use. I’m especially fond of the list for contact information for different service providers. If that can keep me from searching for a bill to find a customer service phone number, I’m all for it! The theory is that if you put all of your important information in one binder, you won’t have to hunt for that info ever again. Unless you lose the binder, of course.

Obviously, if it’s helpful to organize your schedule and important information, it’s also helpful to organize the rooms in your home to keep from having to search for important items. If everything has a home, you’ll almost always know where to find what you need. A while back, I made a key rack for our entryway, because I would spend several minutes each time I needed to leave trying, frantically, to find my keys. So, now I’m in the habit of hanging them up as I walk in the door. If I forget to do it, I don’t put the keys down just anywhere – I walk back to the rack. It’s saved me a considerable amount of time and frustration. While you’re organizing, you can arrange things so that they’re more easily accessible. If you’re vertically challenged like I am, or if you have trouble crouching or bending over, you may consider using an over-the-door organizer. The plastic dollar store shoe organizers work well (you can even cut them in half to hang from smaller cabinet doors in the kitchen and bath,) or you can try any one of these genius ideas:

Take things one area at a time. Not only will it keep you from overdoing it, it will give you a satisfying sense of accomplishment once you’ve finished. Have two or three bags or boxes nearby for trash, recycling, and donations. It’ll keep you from putting anything back that you no longer need or want, and the space will appear less cluttered, which can also keep you from finding what you need.

Once you get to your closets, you may as well do a little editing. Keep those same bags or boxes nearby, but this time for trash, donations, and cleaning rags. Single socks whose mates have been lost to the dryer make great cleaning rags – just put your hand inside the sock and go. My grandmother used socks specifically for furniture polishing, and guess what I loved doing as a kid as a result? (When you’re not cleaning, the sock doubles as a puppet!) For a little help deciding what to keep and what to toss, follow the flow chart below.

Remember to take things one area at a time, and set realistic goals for yourself. It may take you a week, or it may take you a few months to organize your home. The key is to stick with it once you’ve finished! Things won’t be perfect all the time, and you’ll still forget things, but if you maintain just a little more order than you started with, you’ll maintain that much more sanity.

Gentle hugs,

Chels

Easy things to repurpose this spring!

2 Apr


I don’t know if you’re into the spring cleaning thing like I am, but, it can be a little stressful. For me, it’s not so much the cleaning that’s daunting, or boxing up things we no longer need, but finding a place to donate or dispose of those things. Unfortunately, we don’t have the best recycling opportunities where we live, and I’m also sentimental person, so it’s easy for things to get a little cluttered. With a little creativity, and maybe an even smaller amount of money, though, you can turn your trash into something useful to justify keeping , give to someone else, or even sell if you’re feeling entrepreneurial.

7149_10151555476874427_1897003756_n


A colander is a perfect choice for a planter – they’re shatter proof and self-draining!


This was a huge “duh” moment for me. Use this little scoop as a mini dustpan, a scoop for dog food or other dry items, or as a spade.


I’m sure this book display could inspire other tool-related ideas.


This just cracks me up! Sure, it takes a certain aesthetic, but if you have an old painting that’s a little worse for wear, why not touch it up with a little monster love? Unicorns frolicking through a Bob Ross inspired meadow, anyone?


This scarf goes beyond turning your old t-shirt into some other kind of top. You can highlight your favorite parts (or less damaged parts) of your favorite shirts with basic sewing skills.


I already have a thing for colored glass and vases, but most of us have a generic clear vase or two that came with a flower delivery, and this is a really easy way to update them.


Do you have kids? Have they outgrown their wooden blocks? Dip ’em in paint and screw those babies into the wall for instant storage space. (Just a thought – you could also use blocks of the same length as feet for a jewelry box or anything else you’d like to elevate.)

Take a second look at the things you’re not using and brainstorm, or search on Google or Pinterest for an afternoon of time-sucking fun!

Gentle hugs,

Chels


DIY Tutorials: Jazz Up A Bookshelf

30 Jul

This is my final tutorial in my apartment makeover series. We have these built-in bookshelves in our apartment, and, other than needing a new coat of paint, they’re actually really practical. I try to keep the collection as small as I can, but truth be told, I’m a bibliophile. My books are important to me, and I’m happy that we have a designated space for them. (Though we have a couple of “spill over” spaces for them, too!) We also have a modest DVD collection, so those shelves are pretty full.

A few weeks ago, some ideas started brewing in my brain, and I wanted to use the rest of the wood grain contact paper that was stashed in a corner of my craft closet. This year has been all about using the craft supplies I already have, and only buying the staple items that get used and run out on a regular basis. So, I thought I could make my own decals, maybe some silhouettes to put on the wall … then my eyes drifted to the bookshelf and I remembered seeing cute tutorials on covering the backs of bookshelves with craft paper. I thought, it would be even easier to use the contact paper! It only took a day or so to get it cut and finished. Here’s the end result, plus a nice view of my birthday card display:

This slideshow requires JavaScript.

What you’ll need:

Contact paper (you can find it anywhere from Dollar Tree to Home Depot, depending on the style you want)

Good scissors

Measuring tape

Credit card or another flat, hard edge

How to make it:

1. Measure the back of your bookshelf. Decide whether you want a border around a hand cut design, or if you want to cover the entire area. If you want to cover the entire area, simply cut your contact paper to the correct measurement, peel, and stick. This may take a little practice, but luckily you can peel the contact paper off the surface and try again.

2. If you’ve decided to cut a design around the edges, turn your contact paper over. There should be a grid printed on the paper backing, and you can use that as your guide. Cut the paper to the correct measurement (be sure to allow an inch to an inch and a half for your design.)

3. Now you can begin cutting your design. I used alternating arches and triangles. Each arch was two squares high and two squares wide. Each triangle was smaller, at one inch tall and one inch wide. You can mark your design with a pen, which will ensure you don’t accidentally cut a triangle where there should be an arch, or, if you feel confident, you can just start cutting!

4. You can continue cutting your design on all four sides of your contact paper, or do what I did, and only cut three sides, so that it looks like the design is extending from one side of the bookshelf.

5. Be sure the surface you’re adhering the contact paper to is clean and dry. Finally, peel and stick your design to the bookshelf! Again, it may take a couple of tries, but that’s okay. The contact paper can withstand a couple of removals.

6. Smooth any bubbles out with a credit card by sliding the edge of the card from the center of the contact paper to the outside edge. Repeat until all the bubbles are gone.

This is a quick, easy project that will probably take you less time than it did me, unless you’re coming up with your own design, which could take a while. Experiment on a scrap piece of contact paper, then hold it up to the bookshelf to see what kind of design you like. The beauty of this project is that it’s not permanent, so if you change your mind, you don’t have to worry about paper sticking to the shelf or adhesive residue.

Gentle hugs,

Chels