Tag Archives: inspiration

Update your wardrobe for free (or really cheap!)

12 May

One of my favorite thrift stores in my hometown!

If you’re a spoonie (someone with chronic illness,) you know how taxing it can be to go to a mall or big department store full of people. I personally thrift the majority of my clothing, and prefer the atmosphere of thrift stores to big chain stores. If you’re able to go on a weekday, there usually aren’t many people, the people who are there are generally friendly (it’s easy to strike up conversation when you find something fun, like a vintage embroidered mumu,) and the prices are great.  I’m fortunate that the stores in our city tend to have a large selection of good quality, vintage, and name brand and designer clothing and accessories. I occasionally enjoy hitting up local antique stores, too, where I can find really unique clothing pieces and accessories (if I can afford them!)

Lately, I’ve been on a closet revamp kick. I’ve always enjoyed wearing more “alternative” styles, and personally draw inspiration from rock and roll, punk, goth, and gypsy styles. Since I no longer live or work in a place where a certain image is expected, I’ve decided to revert back to the style I feel best suits me.  Alternative style cultures promote DIY and handmade looks, since it’s all about unique, individual expression, but you can incorporate these techniques into any style!

Why alter clothing?

1. It’s fun! Even if you don’t normally enjoy arts and crafts, there’s something really special about putting your mark on something you’re going to wear. When people compliment you, you’ll get to say that you did it yourself!

2. It can be a very inexpensive hobby. You can often find supplies like studs, embroidery thread, and patches online for much less than you find them in stores. Try searching eBay or Amazon.

3. You can use what you already have. Updating your wardrobe can be as easy as using what’s already in your closet. Cut a collar off of an existing button-up shirt, and use it as a necklace, or sew it onto another shirt. Cut an applique or image from a shirt, and sew it to a jacket or vest. Embroider a message or design on pair of jeans. Cut up t-shirts, and use the remnants to make bracelets or necklace. Draw on a pair of old tennis shoes with a Sharpie. Chances are you already have the supplies you need to start altering what you have. Just Google DIY clothing projects if you need a little inspiration.

I’ll post pictures of my personal projects to (hopefully) inspire you just as soon as the stormy spring weather decides to give me a little natural light for photos. Until then, check out my Smashin’ Fashion Pinterest board for ideas:

Old suits refashion.


Gentle hugs,

Chels

Are you going to Scarborough Faire?

10 Mar
fool hearty

Click to visit SRFestival.com

Next month begins one of my favorite times of year – the time we get to go to Scarborough Renaissance Festival in Waxahachie, TX!

This year, the hubs and I are dressing up. (In past years, we’ve dressed in costume, but not every year.) My guy’s going with a green man/wild man vibe, and I’m finishing up the dragon fairy costume I started making a couple of years ago.

Here’s the hub’s inspiration:

Luckily, between my mom and I, we happen to have a plethora of furry and leather trims and fabrics to use. I’ve made a couple of “found object” necklaces with things I had lying around. Now, I’m working on creating a headdress.

I didn't want to pay for a bird skull, so I created one from some black Sculpey and whitewashed it.

I didn’t want to pay for a bird skull, so I created one from some black Sculpey and whitewashed it.

Wire wrapped beads and arrowheads on leather cord make manly, rustic jewelry.

Wire wrapped beads and arrowheads on leather cord make manly, rustic jewelry.

Here’s my costume so far:

I’m also finishing a little choli vest to wear (and secure the wings,) and a matching utility belt for the essentials. I can’t wait to test the makeup! I’m going to try to create “scales” using fishnets as a stencil.

Reversible cropped vest with lace up front and sides.

Reversible cropped vest with lace up front and sides.

Follow our Costume List Pinterest board for more inspiration on these and other costumes we plan on creating! 

MadeULook by Lex - Original Human Dragon makeup! Facebook.com/madeulookbylex, youtube.com/madeyewlook

Click this makeup inspiration image to go to our Pinterest board.

Are you dressing up for a fair or festival this year? Share in the comments!

Gentle hugs,

Chels

Enough.

16 Dec

My friend Susan says: Anyone with Chronic Illness has guilt over things not done, meals not cooked, laundry waiting downstairs....Write down everything you do during a day. Even getting out of bed. It is all accomplishments.

Gentle hugs,

Chelsea

A Holiday Home Tour – Winter is Here!

3 Dec

I’ve finished putting up our indoor decorations here at the casa, and the place is looking rather festive, if I do say so myself!

Of course, it’s taken me weeks to finish. This year, I used lots of jewel tones. I like to use them in our decor, anyway, so it kept costs down, and made the theme simple to create. We don’t have a mantel or bar to hang the stockings from, so I hung them from our corner book shelf with care. I found several new things from thrift shops in our area, like a package of metallic jewel toned snowflake ornaments, and a small tree that I decorated with a strand of gold sequins. I made quite a few of our ornaments this year, too! I painted wooden owls in purple and green with glitter, created iridescent white tassels from embroidery thread, and strung colorful pom poms on a strand of metallic gold thread as a garland.

The fake mistletoe is hung, so now it’s time to finish the outdoor decorations!

Gentle hugs,

Chels


Celebrating ends and new beginnings.

5 May

These past several weeks have been an absolute blur!

I successfully planned and helped host our yearly spring banquet here at the center, all while Tom and I were searching for our new home, and helped decorate for our end-of-semester barbecue and karaoke party, while I wasn’t packing to move into our new apartment.

Here are some fun photos of the banquet, a few taken by me, the others taken by our pro photographer friend (and karaoke expert,) Caven Marsh. I had so much fun handing out our paper plate awards again this year, and taking goofy pictures with some of the dear friends we’ve made. We were also blessed with a parting gift from the board of directors, including a beautiful, eco-friendly bamboo plaque.

So, we did it. We found our new home, and it couldn’t be any cooler. While it’s bittersweet moving out of the Tri C, I’m happy for this next chapter of our lives. My mom is also in the process of finding a house, so it’s a really exciting time for all of us! Friends of ours from church referred us to the landlady who lives a street over from them in the historic area of downtown Arlington. They told us that she was going to be listing a duplex and an above-garage apartment soon, and that we should call her a.s.a.p. to view them. To be honest, I wasn’t sure how I felt about an above-garage space. I’ve never been in one, and I’ve never known anyone, that I know of, who has lived in one. I knew that it was small, and that it was behind a beautiful turn of the century house, so it was worth looking into. I was leaning toward the duplex, but when we met with the landlady, she told us that it had already been rented.

So, we made our way up to the little apartment, and we fell in love. It’s like a tree house! The garage below used to be a barber shop, and the original sink and mirrors still remain. The kooky contractor who helped renovate the house found a – no kidding – mummified rat in the walls that was so well preserved, they decided to create a memorial to him and name him Dougie. He now rests in a plexiglass window/shadow box in the wall between the garage and laundry room. Weird, I know, but when we began talking about pets, and mentioned we’d had rats before, she was so excited to show us the little guy! Wood floors, an archway, a claw foot tub, and lots of natural light later, we decided to apply. Granted, it’s not exactly what we had in mind; we still won’t have a dishwasher, but we’ve made it the past few years without one already. The bedroom is significantly smaller than the one we have now, but we were told our queen size bed would still fit (just not much else.) Fortunately, though, we can sell our chest of drawers and get creative with our limited storage space. It’s kind of nice to downsize a bit, anyway. Less to dust.

Soon I’ll be taking pictures and measurements to see what other furniture we can keep, and what needs to go. I’ll be weeding through our other things to see what needs to be donated, stored in the garage, or displayed in the apartment. I’m currently drowning in Pinterest boards about organization, small living spaces, and DIY bohemian-style projects, seeing as that’s the direction I’ve been going with our decor for a while now. Why not give in and make things gypsy-caravan-and-vintage fabulous?

You can take a gander at the rest of my “New Apartment” board here. There’s more boho inspiration and genius decorating and organizing advice.

Gentle hugs,

Chels

“An Evening In Paris”

7 Apr

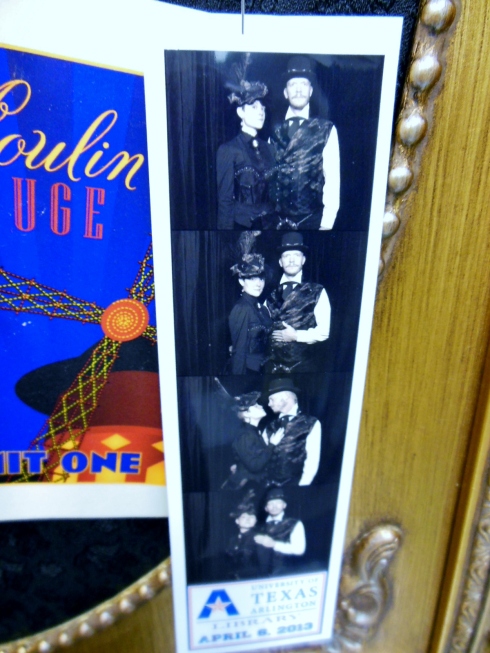
So, last night was the night to reveal our Victorian inspired costumes at the UTA library’s “An Evening In Paris: Dancing at the Moulin Rouge” celebration. I was working down to the last minute, y’all, and I have the craft wounds to prove it. (It’s been a while since I shoved a pin so far under my fingernail that it only bled under the nail … ouch.) After working on my fascinator, jewelry, and beading my bustier for the past couple of weeks, I was down to the wire sewing Tom’s double breasted vest from scratch, sewing my skirt, which, thankfully, only involved tearing apart an existing velvet dress and adding taffeta at the hem, stitching button holes to tighten them, and adding finishing touches. Picture Tom and I standing in our kitchen, eating Wendy’s hamburgers at the counter, trying to avoid dripping condiments on our outfits before walking out the door.

Here’s what the finished pieces look like:

We walked a few buildings down the campus to the library, dressed to the nines, and catching some funny glances and a few laughs. By the way, that’s right – I said library. The librarians and members of the student organization La Societe Francophone transformed the 6th floor of the library, after hours, of course, into a sparkling, red and black spectacle. There was a large dance floor in one room (with professional DJ playing mashups of modern beats with old fashioned piano and horn, including the obligatory hip hop and “Gangnam Style,) and the parlor next door was filled with tables surrounding a red and black themed candy bar, and “Moulin Rouge” playing on a screen in the background. There was a free, professionally run photo booth in the corner, so we took full advantage.

004

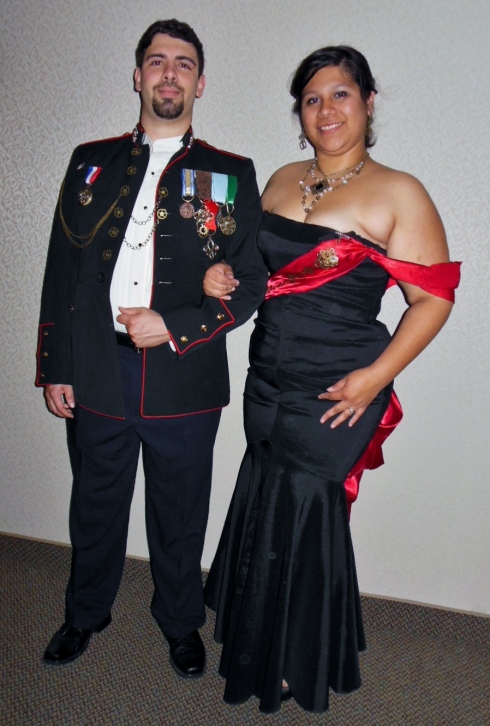
Our friend, Troy, and his date, Cynthia, were there, dressed in Cynthia’s Napoleonic-inspired costumes. She made all of the medals on Troy’s jacket!

006

There was a costume contest, featuring 40 entries (there were more guests in costume who didn’t participate.)

009

We had some serious competition, but we won first place! The couple standing next to the Groucho Marx lookalike, in the brown dress and lacy hat, and black top hat, won second. They were so sweet, and we all spent about the same amount of money on our costumes – a whopping $30.

IMAG0547

As we were narrowed down to the top six looks, each person or couple stepped forward to receive applause from the audience. The man next to us twirled his date in her beautiful dress. So, naturally, when we stepped forward, I twirled Tom in his beautiful kilt.

Here are some more photos of the fun:

We had a blast, but I am definitely paying for it today. I think it was worth it, though, to see all the creativity, and to win first prize for all that hard work! The library was very generous with their prizes, by the way – we won an iPod Shuffle!

Gentle hugs (and dancing feet,)

Chels

Today I’m Inspired.

21 Jun

I’m having a bit of a rough day (not feeling well,) but I can’t help noticing a trend on Facebook: inspiration. I’ve seen several stories worth sharing, so I thought I’d share with you!

First, a story about giving. These ladies make me want to give. And bake, but that’s beside the point.

Next, a list of visual inspirations. Consider my faith in humanity restored. (Also, you should head here to my beautiful friend Rachel’s blog, and listen to some music while you scroll through those photos.)

Finally, there’s this. If you don’t laugh, I don’t know what to do with you. You probably need a good cry first. Or ice cream. Let me know. (P.S. – I’m very, very sorry for the picture of the woman in the men’s restroom. She’s clearly inebriated. But it reminds me to count my blessings!)

Thanks, friends on Facebook, for making my day a little less about me and a little more about baking grannies and boxes of kittens.

Gentle hugs,

Chels

I’m not a painter, but I play one on TV.

1 May

Actually, I’m not on TV, but you probably already knew that.

So, last year was the year of the baby boom. We’re talking 5 (I think? I started to lose count) couple friends from church, and another pair of friends of ours, all multiplying before our very eyes.

One of my awesome friends asked if I would paint letters for her little miracle’s nursery. Seriously, he’s a miracle. “They” said she wasn’t able to have kids, but he’s here and he’s adorable, if I do say so myself.

Anyway, I don’t consider myself a painter. I’ve drawn for as long as I can remember, but I only dabble in paint for fun. I tentatively said yes, and she assured me she had complete faith in my ability to make them look great (because she’s convinced I can make anything,) so I looked at the bedding and decorations for the nursery, and matched the letters to the vintage sports theme they had going on. I didn’t want to charge her, since it’s not normally the kind of thing I make, and I also wanted it to be a present for her and the baby. So, she bought the supplies and I got to painting. I was pleasantly surprised with how they turned out.

It's no Rembrandt, but I was happy with the results. More importantly, she was happy with them!

As soon as I posted the pic on Facebook, another friend asked if I would do a Texas Ranger’s themed set for their soon-to-be baby boy.

So, for the next baby shower, I asked my other mommy friend if she wanted letters, too. She and her hubby came to the decision that they would wait until their daughter was a little older so that she could decide what theme she wanted. I thought that was so sweet, so I gave her an IOU, and I can’t wait to see what little Lila wants her letters to look like.

Next, another friend actually commissioned me to paint letters for both her boy and her girl! I think I freaked out a little more than I did with the others, since she’s paying me to do them, and she’s trusting me to make executive decisions, so it’s taking me longer than I would like to get them “right.” We decided on an old school superhero theme for her boy, and a Disney princess theme for her girl. This is what the superhero letters look like so far:

These are two of the finished letters. I don't know if you can see it, but the edges of the letters are navy blue, and each image is outlined in glossy black. Every superhero emblem is going to glow in the dark!

So, all of a sudden, I’m having fun painting, and I wanted to share with you guys that you can do this, too, even if you don’t consider yourself an artist or painter. I’m not being modest; I’ve never taken a painting class in my life, and I know these aren’t exactly masterpieces. I’ve seen sites that charge quite a bit per letter (and rightfully so,) but this is something you can do yourself if you stick with a simple theme and basic shapes. So, if you have a kid in your life, or a new mommy friend, and would like to give them the gift of the kiddo’s name spelled out on the wall, try it! The supplies are relatively inexpensive, and you won’t use all of the paint you buy on one project, so you get more bang for your buck. If you aren’t up to spelling out a long name, go with initials, or just the first letter of their first name.

What you need: 

Wooden letters from a craft/hobby store (anywhere from $1.99 – $3.99 ea., depending on the size and fanciness of the letter shape)

Acrylic paint in the colors of your choice (anywhere from $.75 – about $3.99 a bottle, depending on the quality of the paint, and the size of the bottle – dont forget to check the clearance section)

Brushes in different sizes (about $5 for a good beginner’s brush kit)

Stencils, if you don’t want to draw a design (I’ve found good ones at the dollar store)

Metal zig zag hangers or ribbon to hang your letters (keep in mind, they can also be displayed on a shelf, so you can skip this step)

E6000 or some other super strong glue suitable for metal and wood if you plan to hang your letters

Some plastic or cardboard to cover the surface on which you’re painting

A thick paper or plastic plate to use as your palette

Measuring tape or ruler

How to make it: 

1) If you’re not into drawing at all, you can always paint simple polka dots, stripes, or plaid, splatter paint, or stencil the design onto your letters. If you’re comfortable with your drawing skills, sketch your design lightly in pencil on your letters.

NOTE: You may need to remove staples from the back of your letters if they came with a hanging tag. A small flathead scredriver or small needlenose plyers will do the trick to pry those babies off. I won’t lie, I had to have my hubby get most of them out for me, so if you can’t do it yourself, you can probably skip this step and still be able hang them if you like.

2) Paint in stages. Start with your background color, then build from there. If you have large sections of your letters that will be a drastically lighter color than the background color (like the sports or superhero themed letters,) do not paint over those sections with the background color. It will take more time and effort to cover the area in a light color if you’re painting over a dark one.

3)  Take your time, and let your paint dry before you start painting the next section. Nothing more frustrating than smearing your paint because you needed to brace your hand against the letter while painting. Plus, it will give you a break if you need to stand, or if you’re starting to hurt because you’ve been hunched over your letters.

4) If you find it hard to paint the edges of the letters, here’s a tip: use thumbtacks or other objects to prop the letter up off of your painting surface. It will bring the letter closer to you, help avoid hand cramps from trying to awkwardly hold the letter, and will keep the letter from sticking to the surface on which you’re painting.

5) Once your letters are painted and totally dry, turn them over and mark the center of your letter toward the top. (I put two hangers on letters like the capital “H” for stability.) Adhere the metal hangers or ribbon with your insanely strong glue. Insanely strong usually equals very smelly, so be sure you’re in a ventilated area, and use the glue sparingly.

You’re done! You can get really creative and add glitter or 3D elements to your letters. Heck, if you don’t want to paint them, you could create collages with decoupage, cover them in fabric, even stain them and use a woodburning tool. Also, if you don’t know any kids, this is a nice gift idea for a monogram for a newly married couple, or even for yourself to spell out inspirational words on your own wall.

If you decide to get crafty, please send me pictures of your finished product! I’d love to share them on my blog.

Gentle hugs,

Chels