Archive | I want to make something. RSS feed for this section

Update your wardrobe for free (or really cheap!)

12 May

One of my favorite thrift stores in my hometown!

If you’re a spoonie (someone with chronic illness,) you know how taxing it can be to go to a mall or big department store full of people. I personally thrift the majority of my clothing, and prefer the atmosphere of thrift stores to big chain stores. If you’re able to go on a weekday, there usually aren’t many people, the people who are there are generally friendly (it’s easy to strike up conversation when you find something fun, like a vintage embroidered mumu,) and the prices are great.  I’m fortunate that the stores in our city tend to have a large selection of good quality, vintage, and name brand and designer clothing and accessories. I occasionally enjoy hitting up local antique stores, too, where I can find really unique clothing pieces and accessories (if I can afford them!)

Lately, I’ve been on a closet revamp kick. I’ve always enjoyed wearing more “alternative” styles, and personally draw inspiration from rock and roll, punk, goth, and gypsy styles. Since I no longer live or work in a place where a certain image is expected, I’ve decided to revert back to the style I feel best suits me.  Alternative style cultures promote DIY and handmade looks, since it’s all about unique, individual expression, but you can incorporate these techniques into any style!

Why alter clothing?

1. It’s fun! Even if you don’t normally enjoy arts and crafts, there’s something really special about putting your mark on something you’re going to wear. When people compliment you, you’ll get to say that you did it yourself!

2. It can be a very inexpensive hobby. You can often find supplies like studs, embroidery thread, and patches online for much less than you find them in stores. Try searching eBay or Amazon.

3. You can use what you already have. Updating your wardrobe can be as easy as using what’s already in your closet. Cut a collar off of an existing button-up shirt, and use it as a necklace, or sew it onto another shirt. Cut an applique or image from a shirt, and sew it to a jacket or vest. Embroider a message or design on pair of jeans. Cut up t-shirts, and use the remnants to make bracelets or necklace. Draw on a pair of old tennis shoes with a Sharpie. Chances are you already have the supplies you need to start altering what you have. Just Google DIY clothing projects if you need a little inspiration.

I’ll post pictures of my personal projects to (hopefully) inspire you just as soon as the stormy spring weather decides to give me a little natural light for photos. Until then, check out my Smashin’ Fashion Pinterest board for ideas:

Old suits refashion.


Gentle hugs,

Chels

A chilly and Faire day. (Costume reveal!)

15 Apr

Sorry for the belated post! I’ve been sick for the past week or so with some kind of super cold/sinus infection combo, and I’m just starting to feel like myself again.

Tom and I made it out to Scarborough Ren Fest on 4/5, and it was the coldest, wettest Scarby experience we’ve had yet. I’m not going to lie – we were huddled together and sipping on hot coffee and tea most of the time. We were dressed for warmer weather, but you just can’t rely on Texas to stay in season for too long at a time.

We got lots of compliments on our costumes, and were even photographed by total strangers! Here’s how they turned out:

When we realized how cold it was going to be, we rushed to add some warmer elements to our costumes, like the sheep skin Tom is wearing on his back. The night before, I cut strips of cloth to hand sew to a rug we already own, so that he could slip it on like a backpack. He wore long johns under his peasant pants, too, since the fabric my mom used to make them is pretty thin. I wore leggings under my skirt, and I bought some tall socks at the dollar store on our way to the festival to cut into arm warmers for both of us. I, ahem, had to buy a very pretty velvet shawl as it got colder to help keep my upper body warm, which I ended up gifting to my mom at the end of the day.

I also bought some yummy smelling Fresh Peach perfume oil from Majikah Perfumery, which I love because it’s not alcohol based, and is chemical-free! I also found a dainty, hand-carved wooden wand to go with my fairy costume. We had good food, ran into old friends, and had an overall good time, but headed home early when the drizzle became rain, and the chill became downright cold. Maybe we’ll be able to go again when the weather warms up!

Gentle hugs,

Chels


Shamans and Fairies, Oh My! (an update on our Scarborough Costumes)

2 Apr

So, we picked up our tickets for Scarborough Ren Fest last weekend, and we’re planning on making it to opening day (for the first time!) this weekend. I’ve been working hard on finishing our costumes, and, fortunately, my mom agreed to make Tom’s peasant pants, so I could concentrate on the other stuff.

Now, they’re not your typical renaissance festival costumes, exactly. Tom is going as a shaman/green man combo, and I’m going as a dragon fairy. There are nods to renaissance attire, but they’re in no way meant to be historically accurate.

I finished Tom’s “breastplate” (for lack of a better word.) It went from this:

006

… to this:

011

I embroidered Nordic designs onto a pleather-y fabric (it’s felted on the back, which I hope will be comfortable for him to wear all day.) There are runic compasses, symbols for guiding you to a specific outcome or trait, and a border design I found online. I’ve hand sewn on faux fur trim, and leather fringe and trim, and added moss and acrylic paint for a lived-in look.

I also made antlers/horns from Sculpey clay to add to his headdress. I painted the antlers with various colors of acrylic paint, and sealed with Mod Podge. Then, I attached them to their own cord to be worn underneath the band of the headdress, which I cut holes into for the antlers to “grow” out of.

014

I tried out some makeup looks for my dragon fairy costume yesterday:

010

I plan on dyeing my hair purple before Saturday, hence the purple eyebrows. I still need some practice with using fishnets to produce a “scale” effect on my skin, but I like the way the colors coordinate with the headdress.

To view more photos of our costume pieces, go to this post. You’ll find more of my fairy costume, and some other in progress and inspiration pics!

Gentle hugs,

Chelsea

Are you going to Scarborough Faire?

10 Mar
fool hearty

Click to visit SRFestival.com

Next month begins one of my favorite times of year – the time we get to go to Scarborough Renaissance Festival in Waxahachie, TX!

This year, the hubs and I are dressing up. (In past years, we’ve dressed in costume, but not every year.) My guy’s going with a green man/wild man vibe, and I’m finishing up the dragon fairy costume I started making a couple of years ago.

Here’s the hub’s inspiration:

Luckily, between my mom and I, we happen to have a plethora of furry and leather trims and fabrics to use. I’ve made a couple of “found object” necklaces with things I had lying around. Now, I’m working on creating a headdress.

I didn't want to pay for a bird skull, so I created one from some black Sculpey and whitewashed it.

I didn’t want to pay for a bird skull, so I created one from some black Sculpey and whitewashed it.

Wire wrapped beads and arrowheads on leather cord make manly, rustic jewelry.

Wire wrapped beads and arrowheads on leather cord make manly, rustic jewelry.

Here’s my costume so far:

I’m also finishing a little choli vest to wear (and secure the wings,) and a matching utility belt for the essentials. I can’t wait to test the makeup! I’m going to try to create “scales” using fishnets as a stencil.

Reversible cropped vest with lace up front and sides.

Reversible cropped vest with lace up front and sides.

Follow our Costume List Pinterest board for more inspiration on these and other costumes we plan on creating! 

MadeULook by Lex - Original Human Dragon makeup! Facebook.com/madeulookbylex, youtube.com/madeyewlook

Click this makeup inspiration image to go to our Pinterest board.

Are you dressing up for a fair or festival this year? Share in the comments!

Gentle hugs,

Chels

My (Very Real) Craft Corner

30 Jan

I’ve been on an organization and cleaning kick for the past couple of months, cleaning out our closet for donations, our shelves for books and movies to sell, our kitchen, because it’s bare and needs some sprucing up, and most recently my little craft corner.

I tend to do my work on the couch where it’s comfy, but sometimes I need table space, and don’t want to clear off our dining table. So, I brought in a little folding table we had (and rarely used) in the laundry room downstairs, and put it by my sewing table. I removed the wire shelving I had behind our couch, where I stored all of my craft supplies, and moved the supplies into our corner cabinet, and made a curtain to hide them. Now, I have a nice little nook where I can work and take pictures for the Etsy shops.

It's no Martha Stewart Living feature, but it's practical!

It’s no Martha Stewart Living feature, but it’s practical!

Everything tucks (sort of) neatly behind the couch.

Everything tucks (sort of) neatly behind the couch.

That corner cabinet is packed with labeled plastic shoe boxes and bead organizers. I had to do some serious downsizing to make sure everything would fit, and it came out just right! Now I just can’t buy any supplies for a while …

All of my frequently used supplies are at hand in a few cute containers on the table. The cute crocheted own (made by my talented mother in law!) is filled with embroidery thread, the blue container holds current projects and items that need to be photographed, and the green container holds scissors, drawing and writing supplies, and other small items like a tape measure and pins.

In case you’re wondering, all those containers that look like they’re going to topple over underneath the table are filled with sewing supplies: fabric on bottom, patterns in the middle, and thread and other supplies on top. Next to the stack are embroidery supplies.

I even made a dust cover for my machine from a couple of dollar store place mats and some ribbon. Here’s a similar tutorial using a tea towel. The rolling drawers are filled with supplies we use when we do arts and crafts shows: packaging on top, business cards, labels and tags in the middle, and general supplies on bottom. My sketch and note books, and my inspiration binder are all on top, waiting to be grabbed.

That pretty, funky lamp above the sewing machine is a Loomi Light. It’s made from cardstock pieces that you can alter and assemble yourself; I painted mine with watercolors. You can find the kit here.

So, that’s it! It’s not particularly pretty, but it’s a colorful, functional, organized space with a ton of natural light that inspires me to work. That’s really all I need.

Gentle hugs,

Chels

A Holiday Home Tour – Winter is Here!

3 Dec

I’ve finished putting up our indoor decorations here at the casa, and the place is looking rather festive, if I do say so myself!

Of course, it’s taken me weeks to finish. This year, I used lots of jewel tones. I like to use them in our decor, anyway, so it kept costs down, and made the theme simple to create. We don’t have a mantel or bar to hang the stockings from, so I hung them from our corner book shelf with care. I found several new things from thrift shops in our area, like a package of metallic jewel toned snowflake ornaments, and a small tree that I decorated with a strand of gold sequins. I made quite a few of our ornaments this year, too! I painted wooden owls in purple and green with glitter, created iridescent white tassels from embroidery thread, and strung colorful pom poms on a strand of metallic gold thread as a garland.

The fake mistletoe is hung, so now it’s time to finish the outdoor decorations!

Gentle hugs,

Chels


Our bohemian fall.

15 Nov

The fall/Thanksgiving decorations are up! After stopping by Michaels and noticing these cute packages of little felt shapes meant as table scatter, I decided to make some garland, and put out some fall decorations. The weather is getting cool here in Texas – we had our first freezing temperatures overnight last night – and I can’t wait to make some new dishes for Thanksgiving this year.

032

You can see the garland, strung together with dark purple embroidery thread, on the mirror. I found the tablecloth when going through my dad’s cedar chest, and mixed some leaf shaped votive holders with ones I already had, along with some dollar store glitter pumpkins, and small white (real) pumpkins.

020

I use jewel tones year round, but especially around the holidays!

048


Our corner cabinet is filled with handmade fabric pumpkins, festive leaves, knicknacks, and, yep, more garland.

057


I strung a few strands of fairy lights along the back of our bookshelves, added more fabric pumpkins, and books in coordinating colors.

If I’m being honest, I also put up our new table top Christmas tree. I just couldn’t wait! It’s the only winter decoration I have up, and I’ll be decorating it up to Christmas, I’m sure. Here’s a sneak peek:

063

Wishing you all wellness in the cooler weather, and happiness this holiday season!

Gentle hugs,

Chels

Outdoor Halloween decorating and apartment living

30 Oct

Needless to say, it’s a bummer when you’re browsing the aisles of all the cool outdoor holiday decorations, and you’re currently living in a small apartment. Those inflatable lawn decorations – out. Giant tombstones – where would those go? Lights – no roof to hang them. So, what’s an apartment dweller supposed to do?

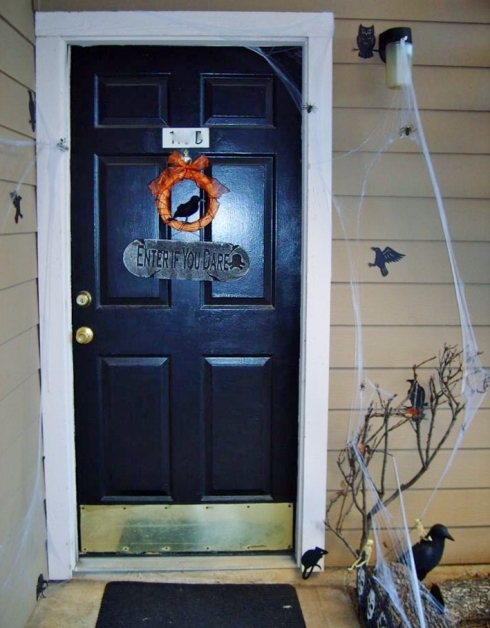
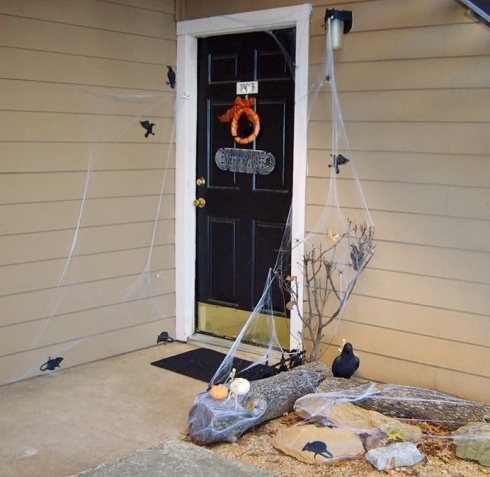
A few days ago, my mom mentioned that she wanted to decorate her apartment for Halloween, but didn’t have any outdoor decorations. She asked if I could bring some with me that day, so I decided to just surprise her and decorate her front door for her. I’m here to tell you – it can be done! Here’s proof:

MomsDoor2013 - Copy

The wreath. I used is simply a small, plain wreath wrapped with orange and black organza ribbon, featuring a feathered crow, and a styrofoam sign. You probably don’t even need a wreath hanger to display a wreath on your front door – just tie a ribbon to the wreath, and through a door knocker if you have one. Most people don’t use them, anyway! (Just be safe and don’t block the peep hole.)

HuntingtonMeadows Use what’s around your apartment. Bushes and plants can be covered in lights, cobwebs, and spiders. You can sprinkle fallen leaves in the cobwebs for a less scary look. Luckily, there are some logs and large rocks already outside her door that made for great props, along with a fallen branch that still had some autumn leaves hanging on. I stood up the branch to create a “tree,” and started spreading the cobwebs! Spider webs can make a big impact, especially when paired with a black light.

Buy and make decorations that are reusable, and small and/or flat, so that they’re easy to store. It doesn’t take bins full of decorations to make your home festive! I added bird and mice silhouettes, a large plastic crow, some plastic “wrought iron” skull fencing, and a few strategically placed mini skeletons. Silhouettes are simple and effective. They take up no space, and you can decorate all the doors and windows in your apartment without breaking the bank. Add spooky colored lights around the inside of the window frames for extra ambiance. Try using lights all in one color for a cohesive look.

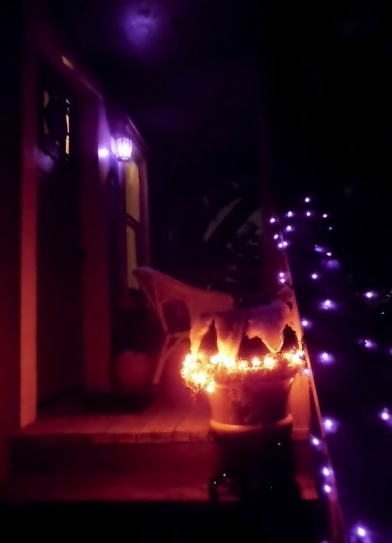
The staircase. At our place, we live on the second floor, so I took advantage of it:

005I added purple lights to our banister, and placed a cauldron on an urn with orange lights wrapped around the base, which I filled with moss, to look like fire. I added a broken limb to stir the brew with, and a sparkling black cat to reflect the lights at night. Then I switched the bulb in our porch light – a quick and inexpensive mood changer.

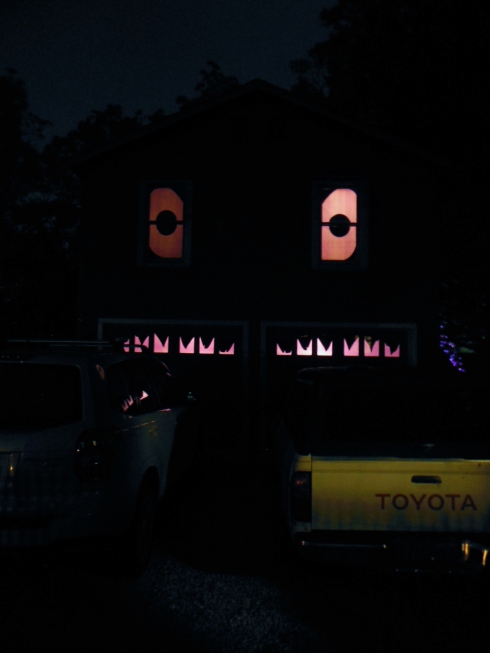
The house (may have) eyes. I also took advantage of our above garage apartment! From the driveway, the windows create the illusion of a face, so I ran with it and created a purple monster to match the purple lighting. I used black poster board to cut out eye and teeth silhouettes, which I taped to the window, then covered in purple plastic tablecloth.

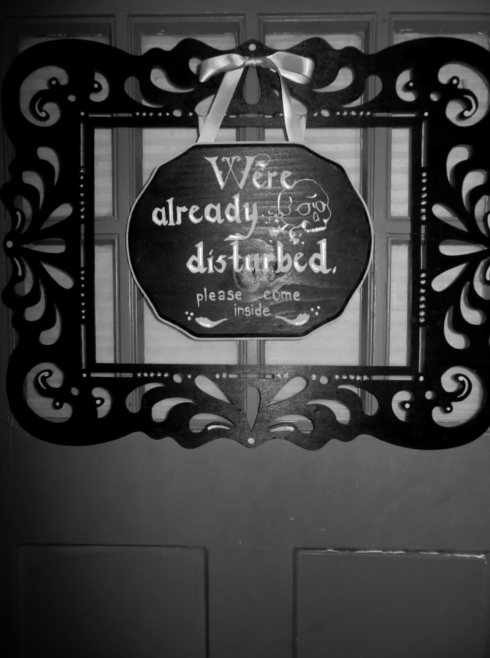
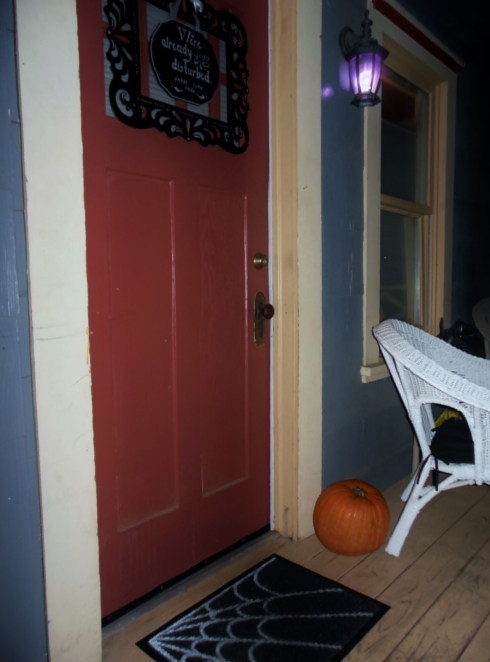
012 Get a little unconventional. Instead of a traditional wreath like my mom’s, I was inspired by the shape of the small window on our front door and used a wooden frame I found at Michaels. I painted it to match a plaque I’d already begun painting; the plaque was the perfect size to fit inside the frame and hang from an existing nail in the door. Now, I realize that not everyone has a wooden door, or a window on their door, but the frame idea still works well on more standard apartment doors. It’s pretty cute to frame your door number.

001Last but not least, switch out your door mat! I bought a cheap black utility mat and painted a simple spiderweb pattern on it with white acrylic paint. It cost me about $4 to make, but you can also find inexpensive themed mats at dollar stores and hobby stores. If your front door is located in a windy corridor, though, it’s worth investing a few more bucks on a heavier mat that won’t blow away.

022

Happy apartment Halloween decorating!

Gentle hugs,

Chelsea

My home: A Halloween Tour! + Cheap and Easy Decorating

27 Oct

I had planned on having a Halloween party this year at our new place, but because of recent events, I’ve decided to wait until next year. Instead, we’ll be handing out candy to the little ones with our new neighbors. I love the holiday so much, though, that I wanted to continue decorating, anyway! So, here’s a peek at our spook-i-fied place. Be sure to read the captions for inexpensive and easy last-minute ideas on decorating your home for Halloween!


Gentle hugs,

Chels

When life gives you hands, make handmade!

26 Oct

Right now is a financially stressful time for us. Tom decided to take a break from school, which means those awesome GI Bill benefits he received for being a full-time student went away and won’t come back until he goes back to classes. Our job as the janitorial staff at the on campus mission where we lived for 2 1/2 years ended shortly after. Add in getting a dog and my dad passing away, and, even with some financial help, we’re pinching our pennies. Fortunately, I’m a habitual saver when we have money to do it. Tom is working part time, and I’m working the arts and crafts scene. I posted on Facebook that I would be happy to do any crafty odd jobs, and got a couple of responses!

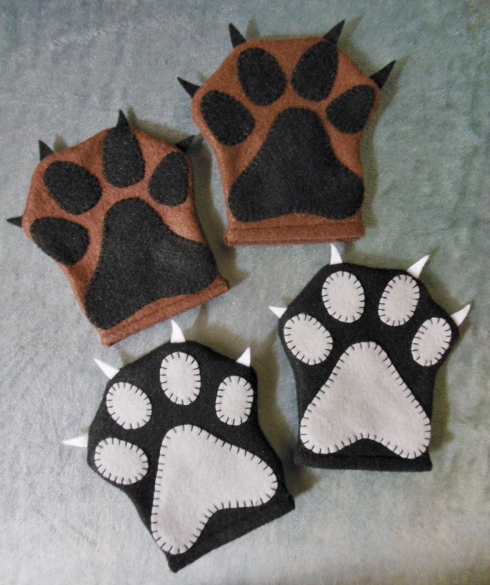
A friend said that her little boy couldn’t decide between being a dog or a cat for Halloween, so she bought a couple of headbands with ears on Etsy, and needed paws to match. After looking at photos of the ears, I created these puppies (snort) to match:

006


This picture was taken before I added elastic to the wrists, but this is essentially how they turned out. I put my felt, embroidery thread, and beginner sewing skills to good use. I’m pretty proud of them! It’s not often that I get to do sewing projects for anyone other than myself, and she loved them, so that makes me very happy! I hope her little boy gets lots of play time out of them beyond Halloween.

Another friend asked if I would paint a small canvas with this phrase:

Count your rainbows, not your thunderstorms

She loves the sentiment, but she wants something that looks more like handwriting, more handmade. She and her family just downsized to an apartment, and she wants this reminder by their front door. I may end up making something similar for myself when I’ve finished hers.

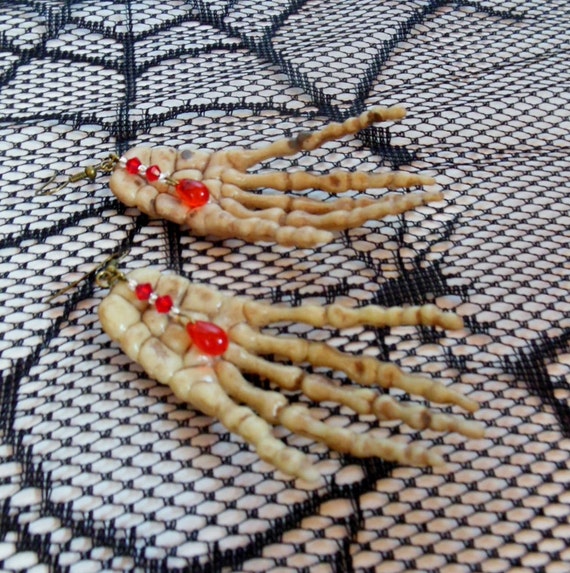
In addition to the odd crafts, Mom and I have been making and listing Halloween-y items for our Etsy shops, and I even set up a booth last Friday at the 13th Street Morgue/Dungeon of Doom haunt grounds. I particularly enjoyed making these skeleton hand earrings (click the image to visit our shop, JuJu Eyeball):

Plastic Skeleton Hand Earrings With Beaded Red Blood Droplets


In another attempt to pay the bills, and, obviously, as a part of the grieving process, we’re having our estate/yard sale next Saturday.


I’m currently making signs, and will spend a large part of tomorrow pricing what’s left in the garage and putting like items together. We recently bought a tent and folding tables to use at arts and crafts shows, so they’ll come in very handy! We’re also borrowing a clothing rack from our friends at the Tri C. Truth be told, I’ve enjoyed organizing yard sales in the past, so that makes this experience a little easier. I like making a “junking” experience a nice shopping experience for people by setting up the way a store would, and I love it when people get excited because they’ve found a good deal. It’s also not your traditional estate sale, since we’re having it at our own home instead of Dad’s, we’re selling some of our own things, and our neighbors will be joining us.

We’re definitely getting creative and working hard for the money, but I’ve been so grateful that Tom has had some extra time to help me with all that’s been going on, and that he’s been able to rest some after his non-stop University experience. I truly believe that everything has worked out the way it’s supposed to, and, even though things are a little stormy right now, I’m going to count my rainbows.

Gentle hugs,

Chels