Tag Archives: DIY

Update your wardrobe for free (or really cheap!)

12 May

One of my favorite thrift stores in my hometown!

If you’re a spoonie (someone with chronic illness,) you know how taxing it can be to go to a mall or big department store full of people. I personally thrift the majority of my clothing, and prefer the atmosphere of thrift stores to big chain stores. If you’re able to go on a weekday, there usually aren’t many people, the people who are there are generally friendly (it’s easy to strike up conversation when you find something fun, like a vintage embroidered mumu,) and the prices are great.  I’m fortunate that the stores in our city tend to have a large selection of good quality, vintage, and name brand and designer clothing and accessories. I occasionally enjoy hitting up local antique stores, too, where I can find really unique clothing pieces and accessories (if I can afford them!)

Lately, I’ve been on a closet revamp kick. I’ve always enjoyed wearing more “alternative” styles, and personally draw inspiration from rock and roll, punk, goth, and gypsy styles. Since I no longer live or work in a place where a certain image is expected, I’ve decided to revert back to the style I feel best suits me.  Alternative style cultures promote DIY and handmade looks, since it’s all about unique, individual expression, but you can incorporate these techniques into any style!

Why alter clothing?

1. It’s fun! Even if you don’t normally enjoy arts and crafts, there’s something really special about putting your mark on something you’re going to wear. When people compliment you, you’ll get to say that you did it yourself!

2. It can be a very inexpensive hobby. You can often find supplies like studs, embroidery thread, and patches online for much less than you find them in stores. Try searching eBay or Amazon.

3. You can use what you already have. Updating your wardrobe can be as easy as using what’s already in your closet. Cut a collar off of an existing button-up shirt, and use it as a necklace, or sew it onto another shirt. Cut an applique or image from a shirt, and sew it to a jacket or vest. Embroider a message or design on pair of jeans. Cut up t-shirts, and use the remnants to make bracelets or necklace. Draw on a pair of old tennis shoes with a Sharpie. Chances are you already have the supplies you need to start altering what you have. Just Google DIY clothing projects if you need a little inspiration.

I’ll post pictures of my personal projects to (hopefully) inspire you just as soon as the stormy spring weather decides to give me a little natural light for photos. Until then, check out my Smashin’ Fashion Pinterest board for ideas:

Old suits refashion.


Gentle hugs,

Chels

Are you going to Scarborough Faire?

10 Mar
fool hearty

Click to visit SRFestival.com

Next month begins one of my favorite times of year – the time we get to go to Scarborough Renaissance Festival in Waxahachie, TX!

This year, the hubs and I are dressing up. (In past years, we’ve dressed in costume, but not every year.) My guy’s going with a green man/wild man vibe, and I’m finishing up the dragon fairy costume I started making a couple of years ago.

Here’s the hub’s inspiration:

Luckily, between my mom and I, we happen to have a plethora of furry and leather trims and fabrics to use. I’ve made a couple of “found object” necklaces with things I had lying around. Now, I’m working on creating a headdress.

I didn't want to pay for a bird skull, so I created one from some black Sculpey and whitewashed it.

I didn’t want to pay for a bird skull, so I created one from some black Sculpey and whitewashed it.

Wire wrapped beads and arrowheads on leather cord make manly, rustic jewelry.

Wire wrapped beads and arrowheads on leather cord make manly, rustic jewelry.

Here’s my costume so far:

I’m also finishing a little choli vest to wear (and secure the wings,) and a matching utility belt for the essentials. I can’t wait to test the makeup! I’m going to try to create “scales” using fishnets as a stencil.

Reversible cropped vest with lace up front and sides.

Reversible cropped vest with lace up front and sides.

Follow our Costume List Pinterest board for more inspiration on these and other costumes we plan on creating! 

MadeULook by Lex - Original Human Dragon makeup! Facebook.com/madeulookbylex, youtube.com/madeyewlook

Click this makeup inspiration image to go to our Pinterest board.

Are you dressing up for a fair or festival this year? Share in the comments!

Gentle hugs,

Chels

My (Very Real) Craft Corner

30 Jan

I’ve been on an organization and cleaning kick for the past couple of months, cleaning out our closet for donations, our shelves for books and movies to sell, our kitchen, because it’s bare and needs some sprucing up, and most recently my little craft corner.

I tend to do my work on the couch where it’s comfy, but sometimes I need table space, and don’t want to clear off our dining table. So, I brought in a little folding table we had (and rarely used) in the laundry room downstairs, and put it by my sewing table. I removed the wire shelving I had behind our couch, where I stored all of my craft supplies, and moved the supplies into our corner cabinet, and made a curtain to hide them. Now, I have a nice little nook where I can work and take pictures for the Etsy shops.

It's no Martha Stewart Living feature, but it's practical!

It’s no Martha Stewart Living feature, but it’s practical!

Everything tucks (sort of) neatly behind the couch.

Everything tucks (sort of) neatly behind the couch.

That corner cabinet is packed with labeled plastic shoe boxes and bead organizers. I had to do some serious downsizing to make sure everything would fit, and it came out just right! Now I just can’t buy any supplies for a while …

All of my frequently used supplies are at hand in a few cute containers on the table. The cute crocheted own (made by my talented mother in law!) is filled with embroidery thread, the blue container holds current projects and items that need to be photographed, and the green container holds scissors, drawing and writing supplies, and other small items like a tape measure and pins.

In case you’re wondering, all those containers that look like they’re going to topple over underneath the table are filled with sewing supplies: fabric on bottom, patterns in the middle, and thread and other supplies on top. Next to the stack are embroidery supplies.

I even made a dust cover for my machine from a couple of dollar store place mats and some ribbon. Here’s a similar tutorial using a tea towel. The rolling drawers are filled with supplies we use when we do arts and crafts shows: packaging on top, business cards, labels and tags in the middle, and general supplies on bottom. My sketch and note books, and my inspiration binder are all on top, waiting to be grabbed.

That pretty, funky lamp above the sewing machine is a Loomi Light. It’s made from cardstock pieces that you can alter and assemble yourself; I painted mine with watercolors. You can find the kit here.

So, that’s it! It’s not particularly pretty, but it’s a colorful, functional, organized space with a ton of natural light that inspires me to work. That’s really all I need.

Gentle hugs,

Chels

A Holiday Home Tour – Winter is Here!

3 Dec

I’ve finished putting up our indoor decorations here at the casa, and the place is looking rather festive, if I do say so myself!

Of course, it’s taken me weeks to finish. This year, I used lots of jewel tones. I like to use them in our decor, anyway, so it kept costs down, and made the theme simple to create. We don’t have a mantel or bar to hang the stockings from, so I hung them from our corner book shelf with care. I found several new things from thrift shops in our area, like a package of metallic jewel toned snowflake ornaments, and a small tree that I decorated with a strand of gold sequins. I made quite a few of our ornaments this year, too! I painted wooden owls in purple and green with glitter, created iridescent white tassels from embroidery thread, and strung colorful pom poms on a strand of metallic gold thread as a garland.

The fake mistletoe is hung, so now it’s time to finish the outdoor decorations!

Gentle hugs,

Chels


Outdoor Halloween decorating and apartment living

30 Oct

Needless to say, it’s a bummer when you’re browsing the aisles of all the cool outdoor holiday decorations, and you’re currently living in a small apartment. Those inflatable lawn decorations – out. Giant tombstones – where would those go? Lights – no roof to hang them. So, what’s an apartment dweller supposed to do?

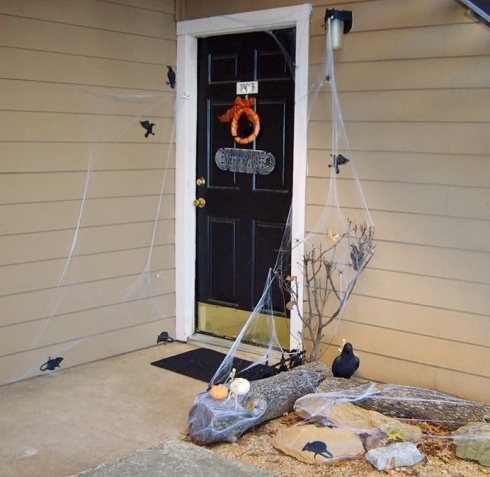
A few days ago, my mom mentioned that she wanted to decorate her apartment for Halloween, but didn’t have any outdoor decorations. She asked if I could bring some with me that day, so I decided to just surprise her and decorate her front door for her. I’m here to tell you – it can be done! Here’s proof:

MomsDoor2013 - Copy

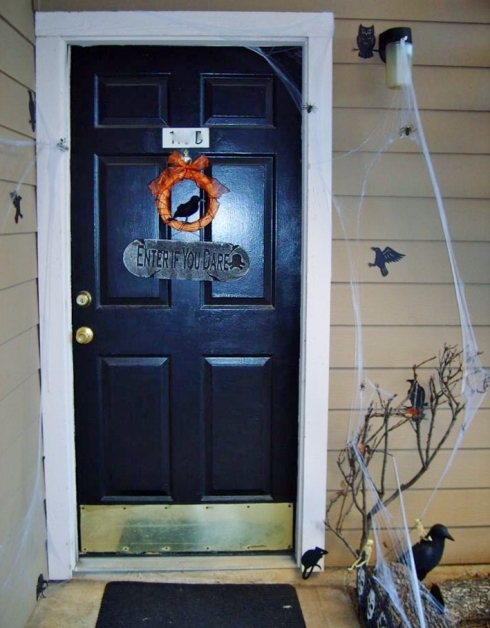
The wreath. I used is simply a small, plain wreath wrapped with orange and black organza ribbon, featuring a feathered crow, and a styrofoam sign. You probably don’t even need a wreath hanger to display a wreath on your front door – just tie a ribbon to the wreath, and through a door knocker if you have one. Most people don’t use them, anyway! (Just be safe and don’t block the peep hole.)

HuntingtonMeadows Use what’s around your apartment. Bushes and plants can be covered in lights, cobwebs, and spiders. You can sprinkle fallen leaves in the cobwebs for a less scary look. Luckily, there are some logs and large rocks already outside her door that made for great props, along with a fallen branch that still had some autumn leaves hanging on. I stood up the branch to create a “tree,” and started spreading the cobwebs! Spider webs can make a big impact, especially when paired with a black light.

Buy and make decorations that are reusable, and small and/or flat, so that they’re easy to store. It doesn’t take bins full of decorations to make your home festive! I added bird and mice silhouettes, a large plastic crow, some plastic “wrought iron” skull fencing, and a few strategically placed mini skeletons. Silhouettes are simple and effective. They take up no space, and you can decorate all the doors and windows in your apartment without breaking the bank. Add spooky colored lights around the inside of the window frames for extra ambiance. Try using lights all in one color for a cohesive look.

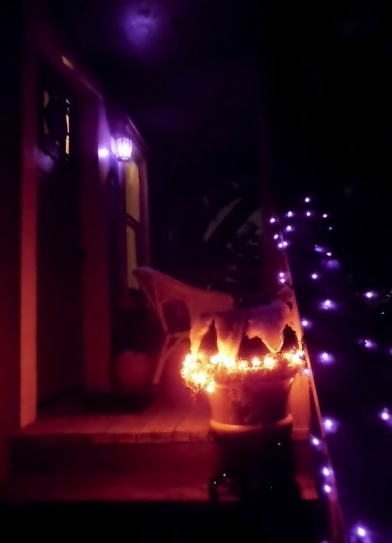
The staircase. At our place, we live on the second floor, so I took advantage of it:

005I added purple lights to our banister, and placed a cauldron on an urn with orange lights wrapped around the base, which I filled with moss, to look like fire. I added a broken limb to stir the brew with, and a sparkling black cat to reflect the lights at night. Then I switched the bulb in our porch light – a quick and inexpensive mood changer.

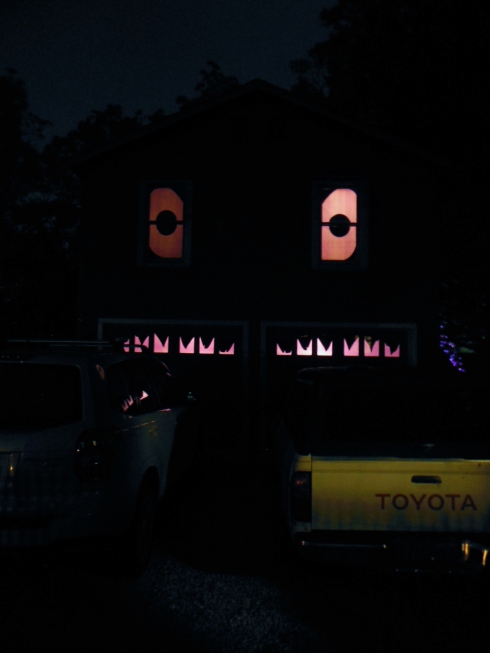
The house (may have) eyes. I also took advantage of our above garage apartment! From the driveway, the windows create the illusion of a face, so I ran with it and created a purple monster to match the purple lighting. I used black poster board to cut out eye and teeth silhouettes, which I taped to the window, then covered in purple plastic tablecloth.

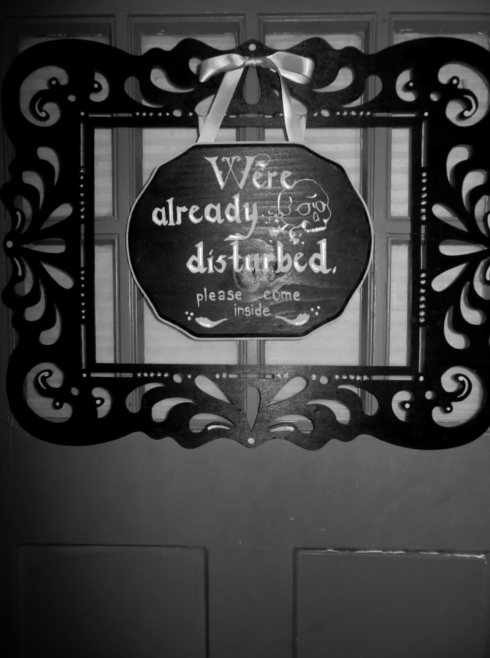
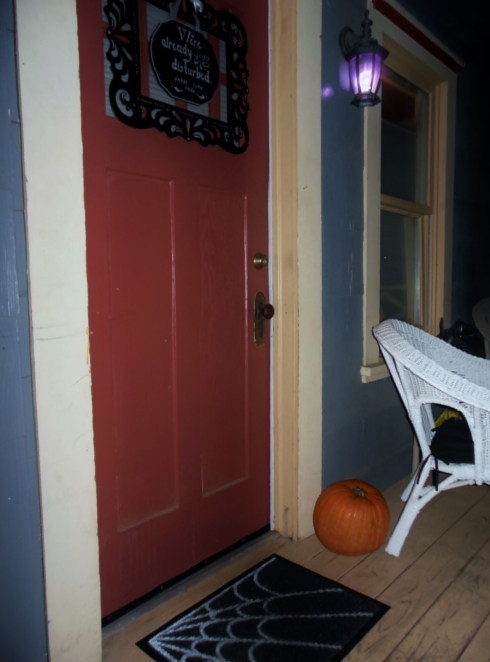
012 Get a little unconventional. Instead of a traditional wreath like my mom’s, I was inspired by the shape of the small window on our front door and used a wooden frame I found at Michaels. I painted it to match a plaque I’d already begun painting; the plaque was the perfect size to fit inside the frame and hang from an existing nail in the door. Now, I realize that not everyone has a wooden door, or a window on their door, but the frame idea still works well on more standard apartment doors. It’s pretty cute to frame your door number.

001Last but not least, switch out your door mat! I bought a cheap black utility mat and painted a simple spiderweb pattern on it with white acrylic paint. It cost me about $4 to make, but you can also find inexpensive themed mats at dollar stores and hobby stores. If your front door is located in a windy corridor, though, it’s worth investing a few more bucks on a heavier mat that won’t blow away.

022

Happy apartment Halloween decorating!

Gentle hugs,

Chelsea

My home: A Halloween Tour! + Cheap and Easy Decorating

27 Oct

I had planned on having a Halloween party this year at our new place, but because of recent events, I’ve decided to wait until next year. Instead, we’ll be handing out candy to the little ones with our new neighbors. I love the holiday so much, though, that I wanted to continue decorating, anyway! So, here’s a peek at our spook-i-fied place. Be sure to read the captions for inexpensive and easy last-minute ideas on decorating your home for Halloween!


Gentle hugs,

Chels

More Halloween Crafty-ness

5 Aug

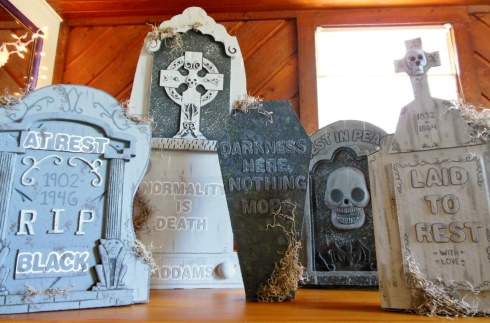
I’m really on a creativity roll, guys! I finished my cardboard/styrofoam tombstones:

014

I think they’re a nice mixture of creepy and whimsical. I’m going for a bizarre, Addams Family inspired look this year.

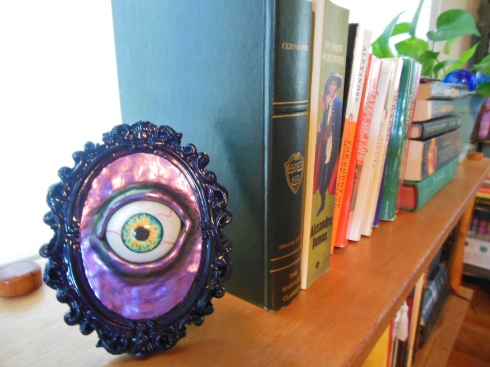
I also tried a technique I found months ago, using a ping pong ball as the base for an eyeball. The “veins” are red embroidery thread, the iris/pupil is decoupaged onto the ball, which I cut in half, and surrounded with Sculpey III clay. I left an opening for the eye, sculpted around it inside the frame, took the eye out, and baked the clay for about 30 minutes. (That was really too long. 15-20 would have been fine.) Then I cut the edges to help the clay fit perfectly in the frame, popped the eyeball back inside the opening, and coated with one of my favorite iridescent nail polish colors. FYI: I found the cute frame at Michaels, in the “dollar” bins for $2.

014


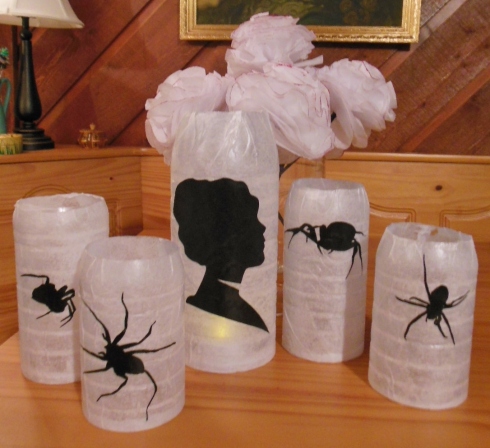
Lastly, save any water bottles you use! When we buy bottled water (which isn’t often,) we tend to reuse the bottles, anyway, so I thought I’d make something pretty from them. This is a super simple project. Cut the top and bottom off of your bottle with a razor, making it whatever height you like. Use Mod Podge to decoupage a sheet of tissue paper onto your bottle, then add silhouette printouts on top. I strongly suggest using battery operated lights inside to avoid any danger of melting the plastic!

001


Do you see that my cameo lady (Marie Antoinette) has been beheaded? I cut a triangle from the silhouette; I like the subtlety of it.

So, I’ve been very productive these past few weeks! Still haven’t decided if we should have a Halloween party or not … maybe I can get my Etsy Fort Worth pals + friends/family together for a Halloween craft party. How are you preparing for fall?

Gentle hugs,

Chels


Only a few months until my favorite holiday!

29 Jul

Can you guess what my favorite holiday is?

Ok, really, this holiday is tied with Christmas, because I love Christmas decorations and cooking.

Halloween!

I know, Halloween’s not for everyone. I get why some people don’t celebrate it, but it’s a family tradition for me. It’s one of the few holidays that really allows for peoples’ creativity to shine through costumes and decorations, and the occasional fright is good for the metabolism! (Unless you have a heart or anxiety condition.)

Since I’m obsessed with making things by hand, saving money, and recycling what we already have, it takes me a while to prepare for such holidays. Of course, I’m not above visiting the dollar store, which is where I get quite a few of our decorations when I don’t have time to make them, and then I update them to make them our own.

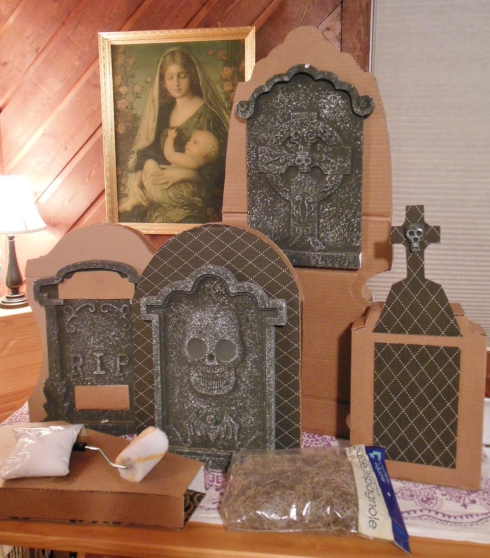
I started getting excited this month when I realized that we have room for outdoor and yard decorations this Halloween, and visions of a graveyard began dancing in my head. We have a few beaten up styrofoam headstones that I bought from Dollar Tree several years back that have weathered the weather and needed some TLC. Generally speaking, I try to avoid using disposable products made from foam, because they don’t biodegrade. BUT – if you’re looking for decorations that will last years, foam lives up to your expectations. So, I started looking at grave stone silhouettes online, mixing and matching lines, and dove into our pile of moving boxes with my razor and pencil. Then I brought out the tacky and hot glue, and came up with these:

010

I glued the styrofoam “stones” onto my cardboard creations for dimension. Next up, they’re all getting a coat or two of grey acrylic paint mixed with that bag of sand in the photo. This is totally experimental, but I’m hoping it will give the stones a grainy, rough texture. Then I’ll paint details and glue on moss, and figure out where I want them to go. Since the cardboard will deteriorate in bad weather, I may put them on the patio come October, then move them to the yard a few nights before Halloween.

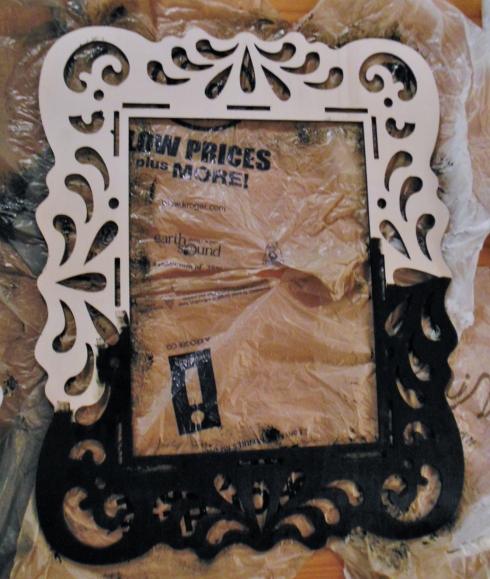
I used up all of my hot glue gun sticks putting these things together, so I stopped by Michaels a few days ago (which, by the way, really made me miss the fact that Dollar Tree didn’t have any for sale – they’re 4 times as much at craft stores!) and found an ornate wooden frame on sale for less than 3 dollars:

011

Immediately, I thought what a cool alternative to a wreath this pretty thing would make, so I brought it home and slathered on a couple of coats of glossy black paint. Then I remembered my stash of wooden plaques, and a cute pic I saw on Pinterest a few weeks back:

So funny!

This is a funny, clever sign, worthy of our front door, don’t you think?

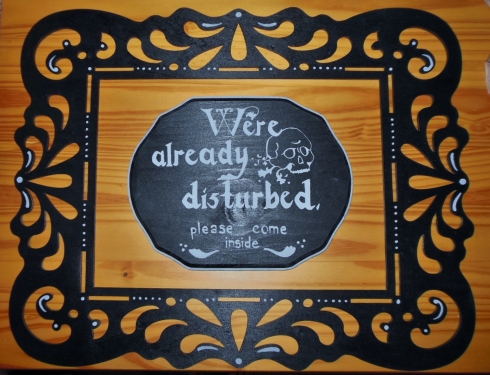
The frame, though, is pretty fancy, so I needed to get a little fancy with my sign. I changed the verbage a bit to reflect the fact that we’re, well, a “we,” and free handed lettering inspired by the “Fiddums Family” font, and a skull inspired by a pattern on urbanthreads.com. This is the end result:

005

Now all I need to do is attach ribbon so the sign can hang from our front door! The frame fits perfectly over the window on our door, and I couldn’t be happier.

Needless to say, I’ve got Halloween on the brain – do you? If you’re looking for more spooky inspiration, follow my “Every Day Is Halloween” board on Pinterest.

Gentle hugs,

Chels

Playing Catch Up – Party planning – a spring banquet.

7 Jul

I started this draft at the End of April, but was so busy with the move that I forgot to finish and post! So, here’s a look back at how our Spring Banquet turned out. I hope it inspires you for your next spring or summer party!

For the past few years, I’ve helped plan and host a spring banquet here at the on campus mission where Tom and I live and work. Every year, we come together to celebrate the students who make our mission what it is, award a book scholarship, and congratulate the upcoming graduates. So far we’ve had a luau and a backyard neon/glow party.

I’ve always been “in charge” of the decorations, but this year was the first year that I planned the party without the help of my friend, Doris, the former secretary here at the Tri C. While I had the help of our new director and secretary, plus a few volunteers, this year I was able to come up with the theme, decorations, food, and order of events myself!

I won’t lie – it was stressful. Party planning takes time, lots of shopping, and delegation (thank goodness.) So, while a couple of board members and my husband took care of making and buying the food, and our friend, Caven, set up his professional photography equipment for our photo booth, my mom and I recruited some students and the Director, Eddie, to move the furniture around so we could decorate.

The theme this year was “New Beginnings.” New staff, new students, and, soon, new interns. Tom and I will be moving out soon, so I wanted this to be a really fun celebration with all of the students we’ve come to know and love. So, I went with a garden/spring theme, and for months I cut out cupcake liner flowers, created centerpieces, made photo props, and planned out the rest of the decor for the cafe of our student center.

I didn’t get any good photos of our banquet tables and centerpieces, but I bought some clear glass jars, lined the inside with brown wrapping paper, and filled them with white, red, and yellow silk flowers, then accented them with little clip-on birds, all from the dollar store! If you’re planning a party, even if you have a large budget, take a look at your local dollar store (I frequent Dollar Tree) for inexpensive decorations and favors. I filled our favor table with little starter pots and seeds, tied with a bow from jute string. I hung white tissue paper poms from the ceiling and placed them on the favor table, which made a big impact, but cost only a few dollars to make from dollar store tissue paper. I reused white Christmas lights, and cut out cupcake liner “flowers” to slip on the bulbs to create a whimsical ambiance near the buffet tables and around the banquet room.

It doesn’t take a lot of money to create a beautiful setting, it just takes a little creative planning. I knew that seasonal items would be in supply for spring, which is part of the reason I chose the “New Beginnings” theme to begin with. Keeping the theme simple saves so much time! If you have a general theme like I did, sticking to a color scheme helps keep the theme cohesive. I went with yellow, red and white, for a cheerful and not-too-girly color palette. Everyone who attended, guys and girls, really enjoyed the decorations.

Fortunately, we had some photo booth props left over from the previous year, which we bought from Oriental Trading. We had plenty of hats, sunglasses, and funny headbands, so all I needed to come up with were a few larger props. So, again, I relied on Dollar Tree for a couple of poster-sized sheets of white foam board, a permanent marker, and a couple of bottles of acrylic paint. I cut flower shapes that were large enough to create a hole in the center for someone’s face, then painted one red and one yellow. I used the border of one of the sheets to create a “frame,” and doodled some quick designs around the edge with my permanent marker to make it more visually interesting. You can keep it as simple as you like with these kinds of props, or you can get really creative with glitter, printouts, or anything else you can think of to embellish the foam board.

All in all, the banquet was a big success! I think we had the largest number of students attend this year since Tom and I became interns. Everyone left smiling, and it was a great way to end our journey at the Tri C.

Gentle hugs,

Chels
Celebrating ends and new beginnings.

5 May

These past several weeks have been an absolute blur!

I successfully planned and helped host our yearly spring banquet here at the center, all while Tom and I were searching for our new home, and helped decorate for our end-of-semester barbecue and karaoke party, while I wasn’t packing to move into our new apartment.

Here are some fun photos of the banquet, a few taken by me, the others taken by our pro photographer friend (and karaoke expert,) Caven Marsh. I had so much fun handing out our paper plate awards again this year, and taking goofy pictures with some of the dear friends we’ve made. We were also blessed with a parting gift from the board of directors, including a beautiful, eco-friendly bamboo plaque.

So, we did it. We found our new home, and it couldn’t be any cooler. While it’s bittersweet moving out of the Tri C, I’m happy for this next chapter of our lives. My mom is also in the process of finding a house, so it’s a really exciting time for all of us! Friends of ours from church referred us to the landlady who lives a street over from them in the historic area of downtown Arlington. They told us that she was going to be listing a duplex and an above-garage apartment soon, and that we should call her a.s.a.p. to view them. To be honest, I wasn’t sure how I felt about an above-garage space. I’ve never been in one, and I’ve never known anyone, that I know of, who has lived in one. I knew that it was small, and that it was behind a beautiful turn of the century house, so it was worth looking into. I was leaning toward the duplex, but when we met with the landlady, she told us that it had already been rented.

So, we made our way up to the little apartment, and we fell in love. It’s like a tree house! The garage below used to be a barber shop, and the original sink and mirrors still remain. The kooky contractor who helped renovate the house found a – no kidding – mummified rat in the walls that was so well preserved, they decided to create a memorial to him and name him Dougie. He now rests in a plexiglass window/shadow box in the wall between the garage and laundry room. Weird, I know, but when we began talking about pets, and mentioned we’d had rats before, she was so excited to show us the little guy! Wood floors, an archway, a claw foot tub, and lots of natural light later, we decided to apply. Granted, it’s not exactly what we had in mind; we still won’t have a dishwasher, but we’ve made it the past few years without one already. The bedroom is significantly smaller than the one we have now, but we were told our queen size bed would still fit (just not much else.) Fortunately, though, we can sell our chest of drawers and get creative with our limited storage space. It’s kind of nice to downsize a bit, anyway. Less to dust.

Soon I’ll be taking pictures and measurements to see what other furniture we can keep, and what needs to go. I’ll be weeding through our other things to see what needs to be donated, stored in the garage, or displayed in the apartment. I’m currently drowning in Pinterest boards about organization, small living spaces, and DIY bohemian-style projects, seeing as that’s the direction I’ve been going with our decor for a while now. Why not give in and make things gypsy-caravan-and-vintage fabulous?

You can take a gander at the rest of my “New Apartment” board here. There’s more boho inspiration and genius decorating and organizing advice.

Gentle hugs,

Chels