Tag Archives: halloween

I’ve ventured into Youtube land.

6 Aug

I got brave (and bored) last night, and put up my very first Youtube video! It’s just an introduction with a few fun facts about myself, straight from my mouth hole:

I plan on posting more videos about crafty stuff, maybe some book reviews, Halloween fun, and other things relevant to my little life. If you subscribe to me, I promise to do my best to make better quality videos with thoroughly entertaining content.

Do you Youtube? Link me up in the comments so I can follow you, too!

Gentle hugs,

Chels

I have no shame – please help me win!

4 Nov

If you’re a regular reader, you already know how much I love Halloween, because it’s such a creative outlet for me. You may also know that I’m practically blind as a bat, and I wear glasses or the occasional pair of contacts. So, I was super excited when I saw that Zenni Optical, my favorite site for glasses, is having a “Master of Disguise” contest! So, I entered my costume from last year, which was pretty awesome, if I do say so myself. Unfortunately, I’m wearing contacts in the photo, so I didn’t get to incorporate glasses (which gives me an extra chance at winning,) but I could still win an iPad Mini, which we could really use for our small business! I could also win a gift card to Zenni Optical for a pair of glasses, which my husband needs badly.

So, please go vote for me here!

003

https://www.facebook.com/ZenniOptical?sk=app_519185638168922&app_data

“Like” the page, then scroll down to “vote now,” and go to page 12 to vote for Chelsea K’s mermaid costume. You can vote once a day, so don’t forget to favorite the page and go back and vote through November 11!

Gentle hugs,

Chels

Outdoor Halloween decorating and apartment living

30 Oct

Needless to say, it’s a bummer when you’re browsing the aisles of all the cool outdoor holiday decorations, and you’re currently living in a small apartment. Those inflatable lawn decorations – out. Giant tombstones – where would those go? Lights – no roof to hang them. So, what’s an apartment dweller supposed to do?

A few days ago, my mom mentioned that she wanted to decorate her apartment for Halloween, but didn’t have any outdoor decorations. She asked if I could bring some with me that day, so I decided to just surprise her and decorate her front door for her. I’m here to tell you – it can be done! Here’s proof:

MomsDoor2013 - Copy

The wreath. I used is simply a small, plain wreath wrapped with orange and black organza ribbon, featuring a feathered crow, and a styrofoam sign. You probably don’t even need a wreath hanger to display a wreath on your front door – just tie a ribbon to the wreath, and through a door knocker if you have one. Most people don’t use them, anyway! (Just be safe and don’t block the peep hole.)

HuntingtonMeadows Use what’s around your apartment. Bushes and plants can be covered in lights, cobwebs, and spiders. You can sprinkle fallen leaves in the cobwebs for a less scary look. Luckily, there are some logs and large rocks already outside her door that made for great props, along with a fallen branch that still had some autumn leaves hanging on. I stood up the branch to create a “tree,” and started spreading the cobwebs! Spider webs can make a big impact, especially when paired with a black light.

Buy and make decorations that are reusable, and small and/or flat, so that they’re easy to store. It doesn’t take bins full of decorations to make your home festive! I added bird and mice silhouettes, a large plastic crow, some plastic “wrought iron” skull fencing, and a few strategically placed mini skeletons. Silhouettes are simple and effective. They take up no space, and you can decorate all the doors and windows in your apartment without breaking the bank. Add spooky colored lights around the inside of the window frames for extra ambiance. Try using lights all in one color for a cohesive look.

The staircase. At our place, we live on the second floor, so I took advantage of it:

005I added purple lights to our banister, and placed a cauldron on an urn with orange lights wrapped around the base, which I filled with moss, to look like fire. I added a broken limb to stir the brew with, and a sparkling black cat to reflect the lights at night. Then I switched the bulb in our porch light – a quick and inexpensive mood changer.

The house (may have) eyes. I also took advantage of our above garage apartment! From the driveway, the windows create the illusion of a face, so I ran with it and created a purple monster to match the purple lighting. I used black poster board to cut out eye and teeth silhouettes, which I taped to the window, then covered in purple plastic tablecloth.

012 Get a little unconventional. Instead of a traditional wreath like my mom’s, I was inspired by the shape of the small window on our front door and used a wooden frame I found at Michaels. I painted it to match a plaque I’d already begun painting; the plaque was the perfect size to fit inside the frame and hang from an existing nail in the door. Now, I realize that not everyone has a wooden door, or a window on their door, but the frame idea still works well on more standard apartment doors. It’s pretty cute to frame your door number.

001Last but not least, switch out your door mat! I bought a cheap black utility mat and painted a simple spiderweb pattern on it with white acrylic paint. It cost me about $4 to make, but you can also find inexpensive themed mats at dollar stores and hobby stores. If your front door is located in a windy corridor, though, it’s worth investing a few more bucks on a heavier mat that won’t blow away.

022

Happy apartment Halloween decorating!

Gentle hugs,

Chelsea

My home: A Halloween Tour! + Cheap and Easy Decorating

27 Oct

I had planned on having a Halloween party this year at our new place, but because of recent events, I’ve decided to wait until next year. Instead, we’ll be handing out candy to the little ones with our new neighbors. I love the holiday so much, though, that I wanted to continue decorating, anyway! So, here’s a peek at our spook-i-fied place. Be sure to read the captions for inexpensive and easy last-minute ideas on decorating your home for Halloween!


Gentle hugs,

Chels

When life gives you hands, make handmade!

26 Oct

Right now is a financially stressful time for us. Tom decided to take a break from school, which means those awesome GI Bill benefits he received for being a full-time student went away and won’t come back until he goes back to classes. Our job as the janitorial staff at the on campus mission where we lived for 2 1/2 years ended shortly after. Add in getting a dog and my dad passing away, and, even with some financial help, we’re pinching our pennies. Fortunately, I’m a habitual saver when we have money to do it. Tom is working part time, and I’m working the arts and crafts scene. I posted on Facebook that I would be happy to do any crafty odd jobs, and got a couple of responses!

A friend said that her little boy couldn’t decide between being a dog or a cat for Halloween, so she bought a couple of headbands with ears on Etsy, and needed paws to match. After looking at photos of the ears, I created these puppies (snort) to match:

006


This picture was taken before I added elastic to the wrists, but this is essentially how they turned out. I put my felt, embroidery thread, and beginner sewing skills to good use. I’m pretty proud of them! It’s not often that I get to do sewing projects for anyone other than myself, and she loved them, so that makes me very happy! I hope her little boy gets lots of play time out of them beyond Halloween.

Another friend asked if I would paint a small canvas with this phrase:

Count your rainbows, not your thunderstorms

She loves the sentiment, but she wants something that looks more like handwriting, more handmade. She and her family just downsized to an apartment, and she wants this reminder by their front door. I may end up making something similar for myself when I’ve finished hers.

In addition to the odd crafts, Mom and I have been making and listing Halloween-y items for our Etsy shops, and I even set up a booth last Friday at the 13th Street Morgue/Dungeon of Doom haunt grounds. I particularly enjoyed making these skeleton hand earrings (click the image to visit our shop, JuJu Eyeball):

Plastic Skeleton Hand Earrings With Beaded Red Blood Droplets


In another attempt to pay the bills, and, obviously, as a part of the grieving process, we’re having our estate/yard sale next Saturday.


I’m currently making signs, and will spend a large part of tomorrow pricing what’s left in the garage and putting like items together. We recently bought a tent and folding tables to use at arts and crafts shows, so they’ll come in very handy! We’re also borrowing a clothing rack from our friends at the Tri C. Truth be told, I’ve enjoyed organizing yard sales in the past, so that makes this experience a little easier. I like making a “junking” experience a nice shopping experience for people by setting up the way a store would, and I love it when people get excited because they’ve found a good deal. It’s also not your traditional estate sale, since we’re having it at our own home instead of Dad’s, we’re selling some of our own things, and our neighbors will be joining us.

We’re definitely getting creative and working hard for the money, but I’ve been so grateful that Tom has had some extra time to help me with all that’s been going on, and that he’s been able to rest some after his non-stop University experience. I truly believe that everything has worked out the way it’s supposed to, and, even though things are a little stormy right now, I’m going to count my rainbows.

Gentle hugs,

Chels


More Halloween Crafty-ness

5 Aug

I’m really on a creativity roll, guys! I finished my cardboard/styrofoam tombstones:

014

I think they’re a nice mixture of creepy and whimsical. I’m going for a bizarre, Addams Family inspired look this year.

I also tried a technique I found months ago, using a ping pong ball as the base for an eyeball. The “veins” are red embroidery thread, the iris/pupil is decoupaged onto the ball, which I cut in half, and surrounded with Sculpey III clay. I left an opening for the eye, sculpted around it inside the frame, took the eye out, and baked the clay for about 30 minutes. (That was really too long. 15-20 would have been fine.) Then I cut the edges to help the clay fit perfectly in the frame, popped the eyeball back inside the opening, and coated with one of my favorite iridescent nail polish colors. FYI: I found the cute frame at Michaels, in the “dollar” bins for $2.

014


Lastly, save any water bottles you use! When we buy bottled water (which isn’t often,) we tend to reuse the bottles, anyway, so I thought I’d make something pretty from them. This is a super simple project. Cut the top and bottom off of your bottle with a razor, making it whatever height you like. Use Mod Podge to decoupage a sheet of tissue paper onto your bottle, then add silhouette printouts on top. I strongly suggest using battery operated lights inside to avoid any danger of melting the plastic!

001


Do you see that my cameo lady (Marie Antoinette) has been beheaded? I cut a triangle from the silhouette; I like the subtlety of it.

So, I’ve been very productive these past few weeks! Still haven’t decided if we should have a Halloween party or not … maybe I can get my Etsy Fort Worth pals + friends/family together for a Halloween craft party. How are you preparing for fall?

Gentle hugs,

Chels


Only a few months until my favorite holiday!

29 Jul

Can you guess what my favorite holiday is?

Ok, really, this holiday is tied with Christmas, because I love Christmas decorations and cooking.

Halloween!

I know, Halloween’s not for everyone. I get why some people don’t celebrate it, but it’s a family tradition for me. It’s one of the few holidays that really allows for peoples’ creativity to shine through costumes and decorations, and the occasional fright is good for the metabolism! (Unless you have a heart or anxiety condition.)

Since I’m obsessed with making things by hand, saving money, and recycling what we already have, it takes me a while to prepare for such holidays. Of course, I’m not above visiting the dollar store, which is where I get quite a few of our decorations when I don’t have time to make them, and then I update them to make them our own.

I started getting excited this month when I realized that we have room for outdoor and yard decorations this Halloween, and visions of a graveyard began dancing in my head. We have a few beaten up styrofoam headstones that I bought from Dollar Tree several years back that have weathered the weather and needed some TLC. Generally speaking, I try to avoid using disposable products made from foam, because they don’t biodegrade. BUT – if you’re looking for decorations that will last years, foam lives up to your expectations. So, I started looking at grave stone silhouettes online, mixing and matching lines, and dove into our pile of moving boxes with my razor and pencil. Then I brought out the tacky and hot glue, and came up with these:

010

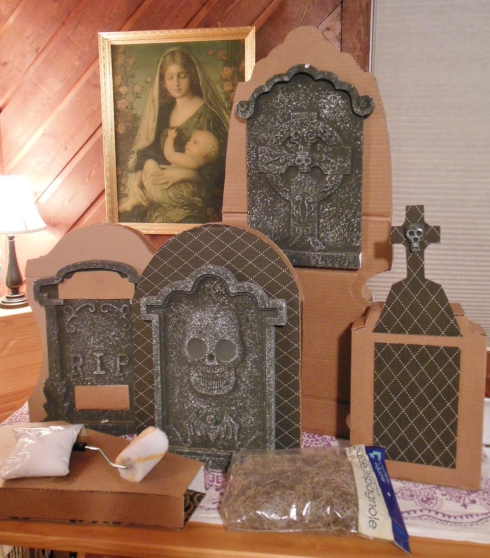
I glued the styrofoam “stones” onto my cardboard creations for dimension. Next up, they’re all getting a coat or two of grey acrylic paint mixed with that bag of sand in the photo. This is totally experimental, but I’m hoping it will give the stones a grainy, rough texture. Then I’ll paint details and glue on moss, and figure out where I want them to go. Since the cardboard will deteriorate in bad weather, I may put them on the patio come October, then move them to the yard a few nights before Halloween.

I used up all of my hot glue gun sticks putting these things together, so I stopped by Michaels a few days ago (which, by the way, really made me miss the fact that Dollar Tree didn’t have any for sale – they’re 4 times as much at craft stores!) and found an ornate wooden frame on sale for less than 3 dollars:

011

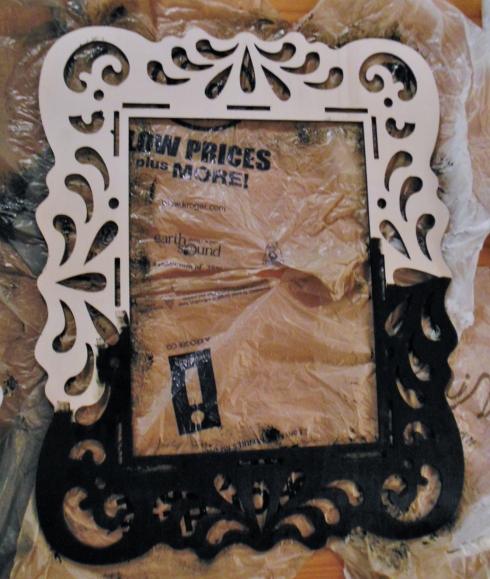
Immediately, I thought what a cool alternative to a wreath this pretty thing would make, so I brought it home and slathered on a couple of coats of glossy black paint. Then I remembered my stash of wooden plaques, and a cute pic I saw on Pinterest a few weeks back:

So funny!

This is a funny, clever sign, worthy of our front door, don’t you think?

The frame, though, is pretty fancy, so I needed to get a little fancy with my sign. I changed the verbage a bit to reflect the fact that we’re, well, a “we,” and free handed lettering inspired by the “Fiddums Family” font, and a skull inspired by a pattern on urbanthreads.com. This is the end result:

005

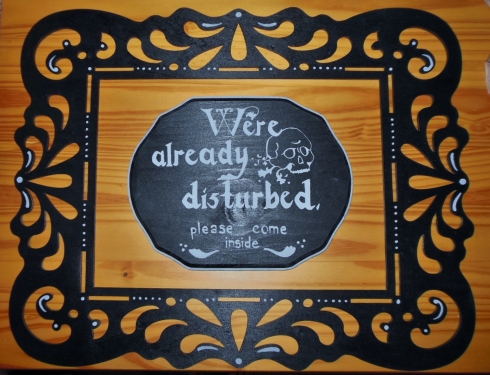
Now all I need to do is attach ribbon so the sign can hang from our front door! The frame fits perfectly over the window on our door, and I couldn’t be happier.

Needless to say, I’ve got Halloween on the brain – do you? If you’re looking for more spooky inspiration, follow my “Every Day Is Halloween” board on Pinterest.

Gentle hugs,

Chels